Showing posts with label Lindy´s Moon Shadow Mists. Show all posts

Saturday, March 22, 2014

A fast and easy card project

Hi there! One more rusted paper project from me today, with a little addition to the "simply stencils" series, too. I used the paper piece I had rusted my metal elements on for this card as a background.


I first glued the paper onto the card base, inked the edges with black Distress Ink, applied some mist splatters and drew faux stitching around the edges for additional detail. Next I stamped some chevron patters with black ink onto the background and then cut some dry embossed foil elements and placed them onto the card. After that I I used a stencil as a doodling guide and drew some triangles for additional interest. After that I just added some sticker elements (some glued using foam dots) and wrote the sentiment. Some white ink splatters for additional detail and the card was all done.

xoxo, Sanna

Wednesday, March 19, 2014

A rusted background layout

Hello there! Today I´m sharing with you one more project I used the March mixed media kit for. This time I created a rusted layout background. This is also the very first project to my "simply stencils" series. I use stencils on almost every layout I make and love using them, so you will be seeing more of those on my future projects.

Here is how I did it:

I first applied some Glue n´ Seal with a paint brush onto the cardstock and then poured the powder over the "glued" areas. Next I sprayed some white winegar over the powdered areas and let the media react.
And this is the rusted paper result I ended up with! Really, really like this effect alot! I then added some mist splatters here and there as they perfectly matched the rust colour.

 
Next I added some stamping (used a Frog Dog Studio exclusive stamp).

After that I added some circles onto the background for additional detail. Here I used a TCW stencil (by Ronda Palazzari) with black Distress Ink. Love the effect the simple circles create on the background! Now the background was all done and I just needed to add some decoration and the title.
I used all the leftover pieces of chipboard, foil tape and corrugated cardboard. Added some sticker elements, some twine, some doodling and some white ink (Liquitex Ink! Titanium white) for detail. This is what the finished layout looks like:
It was so much fun creating this page! I really like the rusting powder on paper!
xoxo, Sanna

Saturday, March 15, 2014

Notebook in a box

Hi, here comes my second box project with the March mixed media kit. This time I wanted to create a little present set with a tiny DIY notebook inside the box. And this is what I did:

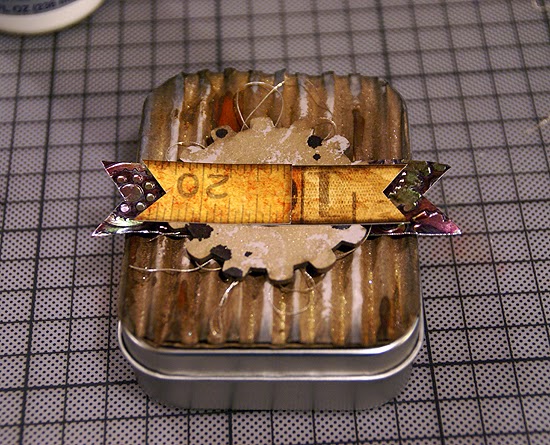
I first cut a piece of corrugated cardboard to match the lid size.

Next I sprayed with the "Silhouette Silver" and the "Golden Doublooms" mists (Lindy´s Stamp Gang) over the paper and the let surface dry.
After that I dabbed some acrylic paint (Pebble) here and there for additional grungy effect.
And finally added some rusting powder here and let it do it´s magic.

After that I started decoration the box. The chipboard elements got a layer of mist and acrylic paint over them.
When that layer was dry I applied some black ink droplets here and there (Mantilla black).
After the chipboard pieces were all dry, I added some metal clockwork pieces and a little piece of dry embossed, with alcohol inks treated foil cardstock. 

I layered various pieces over each other (also some stickers from the sticker sheet book that was in the kit). 
After finishing the lid decoration, I swapped over to the bottom part of the box and taped a washi tape around the box for additional interest. 

After finishing the box I wanted to create a little DIY notebook to go with it and made it the size to fit into the box. For the notebook I cut a piece of kraft carstock, rounded the edges and folded it in the middle. Then I took some notebook paper, cut it to match the book cover size and using a stapled the pages to the cover. 
Next I just decorated the notebook cover with corrugated cardboard, foil tape and some Golden Doublooms mist.
I also added some sticker elements and a small chipboard piece on top.
This is what the book loos like after it was finished.
And here is the complete finished set.
I hope you have enjoyed this little project idea!
xoxo, Sanna