Showing posts with label Frog Dog Studio. Show all posts

Saturday, May 24, 2014

Lucious Layering and Stamped Resin Pendants...

Hello – it's Brenda Burfeind visiting today from the Amazing Crafting Products Creative TeamToday I am going to show you a technique I hope you will enjoy. Many times I use my products not like they are supposed to be used. I love to experiment and with that let's see what I have to share with you today.


There are still a few April Add-On kits with the Amazing Mold Putty and Amazing Clear Cast Resin... and a birdie told me that it's on Sale in the Frog Dog Studio store {as well as the Alumilite Metallic Powders}.


I received the new Frog Dog Studio May Mixed Media Kit and wasn't quite sure how to use it. There are a lot of cool items in this kit, but for me it was a bit overwhelming. I'm not much of a artist in the sense of drawing and painting. Today I am sharing what I have done with some of the parts and pieces.


In the April Kit we received these awesome acrylic pieces. Of course I had to mold them before using them. You can go here to see a video how to make your molds using the Amazing Mold Putty. I molded this piece with the Amazing Casting Resin and Alumilite Metallic Silver Powder.


I applied the Beach Hut Paper Artsy Chalk Acrylic paint directly to my stamp and pressed my Amazing Casting Resin piece directly onto the stamp upside down and let it dry. Then I used the Pastel Peach Quick Dry Fluid Chalk onto another part of the stamp and pressed my resin piece directly onto it upside down again. The reason I did it this way is so that I could control which part of the stamp I was using, since it is a big stamp.


I just ran my stamp under some warm water soapy after I was finished stamping and it came pretty much clean. The paints do not alter your stamp in any means, just not as gray as it was brand new. You just don't want to let the acrylic paints dry and clog up the detail in the stamp.

Now before I did all this I knew I wanted my piece to have a textured, 3D effect. How was I going to create that texture of the stamp? How about embossing it? I of course did not have any colored embossing powders to match those colors that came with the kit – but last month we also received these fabulous Aumidust Powders. SO off to experimenting again... I combined regular clear embossing powder with the Orange Alumidust and mixed them together.


Eureka!!! DIY Orange Embossing Powder!


Then after I had stamped my image from above, I sprinkled the embossing powder over the resin piece IMMEDIATELY. The Pastel Peach says its quick dry and I didn't know how "quick" drying it was.


Poured the remaining embossing powder back into my container and, then I set the embossing powder with my heat gun. The result is fabulous shimmery detail.


I wanted my piece to shine so I mixed up some of the Amazing Clear Cast Resin and added a layer to dome my piece. You might be curious as to what I have my pendant suspended on... CLICK HERE to see my DIY Doming Platform for resin.

That had to set up and cure for about 24 hours...


and now I have another pendant created all while experimenting.


I hope I've given you some ideas on how to use your products – not the way they were intended... don't be afraid to experiment. Sometimes you may "fail" but I always have fun trying new and different things. I really love the dimension and layers of texture captured in the Amazing Clear Cast Resin.

Thanks for stopping by! I will also be sharing another project on my blog on June 2nd using more of this month's kit. So please save the date and hope to see you at Creativity is a State of Mind.

Until next time, keep experimenting ~ Brenda Burfiend

Wednesday, May 14, 2014

#Cre8time Play with Pergamano...

Hello! Sandra Strait visiting again from the Amazing Crafting Products Creative Team to share another project made with the May Frog Dog Studio Kit and Amazing Crafting Products


I was thrilled when I opened the May kit. I've wanted to play around with the parchment pergamano technique. The kit included a Clearprint Vellum book which contains a form of parchment, so my chance had arrived!


The May Frog Dog Studio kit:
(1) Stampendous, n*studio stamp set, Wired
(1) Stencil Girl, n*studio, 6x6 stencil
(1) Clearprint, 6x8 Clear Vellum Field Book
(1) PaperArtsy Fresco Finish Paint, Pumpkin Soup
(1) PaperArtsy, Fresco Finish Paint, Beach Hut
(1) Imagine Crafts Fireworks Spray Mist, New Sprout
(1) Royal Langnickel Oil Pastel 12 piece set
(1) Prima Marketing Chalk Edger Ink, Pastel Peach
(1) Prima Marketing Chalk Edger Ink, Pastel Green
(3) Maya Road Metal Clips (random)
(3) Prima Wood Embellishments (random)
Valued at over $45

Amazing Crafting Products:
Amazing Mold Putty
Amazing Casting Resin
Alumilite Alumidust Powders - Gold, Cotton Candy, Lt. Green, Bright Blue

Parchment Pergamano Technique

Pergamano is essentially a dry embossing technique. Using instruments with rounded tips you press into the paper as though you were drawing. This embosses, pushes the paper out on the other side, turning it white.  I decided to gussy up the cover of the vellum book.

Stencils are often used as guides with pergamano so I decided to use the typewriter from the kit.


It's a bit difficult to describe the process so I'm going to start by showing you the finished embossing. The Clearprint Vellum book has two covers, one a heavier vellum (which is desirable for pergamano), and the other a slick cardstock with printing.


I placed the stencil on the back of the translucent vellum and ran my embossing tools in the open spaces so the raised surface would be on the front of the book.  Here you can see how the vellum turns white and is raised.


I used two different sized ball styluses for most of my embossing.  For the tightest, narrowest places I used the tip of a palette knife, and to even out the large areas, I used a pencil eraser.


When I was done, this is what the front cover looked like.


Creating Depth

Having two covers, one of them translucent, gave me the perfect opportunity to create even more depth. For this part of the project, I used both Fresco Finish paints, the Fireworks spray mist and the Chalk Edger ink in Pastel Peach, as well as the circle of dots stamp.


With a waterproof black pen, I sketched in the image of a piece of paper on the inside cover, and then painted around it with Beach Hut.


I inked up the stamp with Pumpkin soup and stamped circle all around the pages, keep the 'paper' clear.  I added a second layer of Beach Hut to the top portion of the page so there would be a 'wall' and a 'desk' area.


I always seem to forget to photograph at least one step, LOL. Laying the vellum cover down so I could see the stamped circles underneath, I took a waterproof black pen and outlined them. Then I turned the vellum over and used the pergamano technique to create white outlines.


With a red oil pastel, I colored on the back side of the vellum, leaving the embossed areas white. I used a paper stump to smooth out the color.


I spritzed the front of the vellum with the Fireworks spray.


And sponged on some Pumpkin Soup in some areas. I then wiped off most of the Pumpkin Soup so it just tinted most areas, except where the Clearprint logo was. I left it dark to help cover the logo, and to be the base for the dragonfly.


Gluing the Covers Together

Once everything was dry, I used a foam brush
to spread gel medium on the inside cover.


I pressed the vellum cover down to glue both covers together. While it was drying, I used the largest ball stylus tip to work beside the embossed areas so they'd be sure to adhere. I didn't apply too much pressure though, as I didn't want to leave marks.


I set the book aside and went to work on the 3D embellishments.

Creating the Dragonfly


For this part of the process, I used a mold that I had already created using Amazing Mold Putty (for more about that project, check out this post). I made a dragonfly knot with waxed thread, mixed even amounts of both putties, and pushed the putty around the knot, resulting in a shallow but nicely detailed mold.

To color the dragonfly, I brushed Alumidust Powders into the mold. 


I cast my dragonfly with Amazing Casting Resin, mixing equal amounts of Parts "A" and "B", and then stirring until all swirls were gone, about 2-3 minutes. I poured quickly – the resin will set within minutes.


My finished dragonfly glowed with color!


For the wire elements, I placed some gel medium and some Alumidust on my craft sheet, and dragged the wires through the gel first and then the Alumidust. I dabbed the gel medium on the wood pieces and used a paint brush to pick Alumidust and brushed it on.


All that left was to glue the dragonfly, wood and wire items onto the cover. Because both the resin and vellum have slick surfaces, I used E6000® glue to make sure they'd stick and stay on.

List of tools used:
  • E6000® Adhesive
  • Gel Medium
  • Waterproof black pen
  • 2 sizes Ball stylus
  • Palette knife
  • Pencil Eraser
  • Make-up sponge
  • Foam Brush
  • Paint Brush
  • Paper Stump

I hope you enjoyed my foray into Pergamano!


To explore all the products that are available,
please visit the Amazing Crafting Products website.

For more of my work in Amazing Mold Putty, Zentangle-inspired art, and daily links to tangles,
tutorials, and giveaways please visit my "Life Imitates Doodles" blog.Sandra Strait

Thanks for stopping by and have a great day!
...........................................

I invite you to check out the Amazing Crafting Products Blog for more mold-making and resin projects, tips and techniques.

Saturday, April 12, 2014

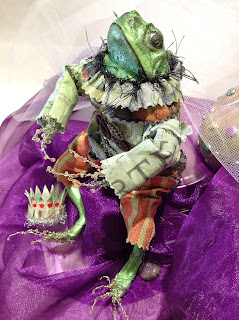
Every Girl has her FROG PRINCE...


Hello creatives! Susan here dropping in with a special project from the Amazing Crafting Products Creative Team today combining items from previous Frog Dog Studio Kits and Amazing Crafting Products – our Partners "In-Crafting". I live in South Florida which is summertime 80% of the year. We had a 48 hour cold spell back before the holidays and when life brings you "creative gifts" you have to run with them. I set off on a journey of creating a custom art doll... but he's more like a FROG PRINCE to me.

To keep this tutorial to a reasonable length, I'm leaving out the molding process. I invite you to please, save the date and visit the Amazing Crafting Products Blog for Mold Rubber Monday on April 14th to see how I created this mold {CLICK HERE to view}.


Supplies Used:
From the December 2013 Mixed Media Kit: Tim Holtz Eclectic Elements - 6" Fabric Crafting Pack; Luminarte Acrylic Silks in Carmen and Fern; Prima Vintage Vanity 2" Stamp "Checkered"; Tim Holtz Ideaology Tinsel Twine; and Duro 6"x6" Stick-On Canvas Pack

Other Supplies Used:
Amazing Mold Putty; Amazing Mold Rubber; Amazing Casting Resin; Alumilite Fluorescent "FLO" Green Dye; Alumilite Pearlescent Metallic Powder; Scissors; paintbrush; mist bottle; sewing machine; Fiskars Pinking Shears; black fun fur; needle with thread; gears from stash; pipecleaners; seed beads and thin 24 gauge silver jewelry wire.


The fabric pad is a wonderful assortment of patterns – many of them perfect to dress my Frog Prince. I really love how the squares have a pinked edge to keep them from fraying.


I had another project I created using the December 2013 Mixed Media Kit and I had this mist leftover made from the Luminarte Acrylic Silks in Fern. CLICK HERE to view mists on my holiday tree in a bottle.


I poured the liquid onto the fabric and let it soak in to stain them to match.


Some I just splattered with the green to add to the distressing, while color coordinating


Details of my painted/splattered squares when dry... totally grungy!


Now I take my base frog cast in Amazing Casting Resin with a mixture of Alumilite Pearlescent Metallic Powder and Alumilite Fluorescent "FLO" Green Dye. Using a brush and my fingers, I apply and build up layers of the Luminarte Acrylic Silks in Fern, letting set, then rubbing some color away to bring out the details. Please visit the Amazing Crafting Products Blog for Mold Rubber Monday on April 14th to see how I created this mold/casting {CLICK HERE to view}.


I set the body and legs aside to dry. Now he is a bright spring green color and ready to be dressed. I think my prince needs a crown to adorn his head.


Using the Luminarte Acrylic Silks, I painted the sticky back canvas sheets with the Fern and stamped with the Prima Vintage Vanity "Checkered" stamp with the Carmen {red}.


I trimmed two sections to be about 2" high by about 4-5" long {I just sort of eyeballed it according to the cylindrical shape I liked}. I peeled off the backing halfway and adhering the tops of each together, then formed into a circular shape forming the crown – overlapping inside slightly and letting one section overlap the other to hold it's shape. For the edges not adhered: I folded up one edge and added fabric scraps to the exposed adhesive to add contrast and texture.


I finished off the crown by cutting triangular peaks and bending the tips outward. You can see the painted canvas inside and out. Those steps could have been skipped, but I am all about the little details - it's a personal preference of how detailed you want to make things. I still have one section of the adhesive edge remaining that I didn't fold over. I trimmed a little off and adhered tinsel twine around the base of my crown. No muss - no fuss. I added some faux painted gems with the red luminarte using the back of my paintbrush. A perfect crown for this prince!


I sort of winged-it when sewing the clothes. My apologies I don't have steps to share. I have been sewing since I was about age 10 so I just went for it since they are such basic shapes. I layered the pieces together and pinned in place to make larger sections. Then I free form cut out pants, a collar, a shirt and sleeve extensions using Fiskars pinking shears {this prevents material from fraying}. I pulled the threads on the collar to gather and added a black fun fur edging around the neck by hand. I hand stitched all the pieces together as I assembled the body to the legs. The size of the clothes are that of a small doll, so the sewing was quick and straighforward... nothing fancy. Since this frog is going to be grungy and steampunk, I let the sewing be tattered to add to his charm.


Before final assembly - I had a bit of work to do to add the digits back to his hands and feet which didn't come out in the molding process due to the thinness and airbubbles in the tiny areas. No worries! Using thin 24 gauge silver wire and seed beads, I fashioned digits and wire wrapped in place on the hands and feet. I really love how realistic they look and the contrast they give against the resin casting... plus now I can bend the wire to pose. I added some layered gears to the shirt front and more of the tinsel twine to tie in with the crown. Now he's ready for his new digs!


A Frog Prince with a Steampunk Twist!


I have to thank Tina for her amazing selections in this Frog Dog Studio Kit. The supplies totally inspired this creation! I encourage you to listen to your muse... and play!

Thanks for dropping by and checking out my project today!
You can find more of my work at the Amazing Crafting Products Blog
~ Susan M. Brown {sbartist}