On my December layout, I did some fun layering with LuminArte Silks Glaze in African Jade:
I love how the Silks Glaze can be built-up and layered on top of itself, for a great tone-on-tone look.
To create this background, I first painted a thin layer with a foam brush, and then "drizzled" paint from the end of a paintbrush to create the dimensional tone-on-tone effect:
I wanted to play a little more with this layering idea, so I created a simple ATC.
First, paint a thin layer of Silks over the Kraft ATC with a foam brush:
Once dry, drip thicker drops of paint onto the surface:
This time, I created some texture by dragging the hard end of the paintbrush through the thick paint:
I added some circles too:
Up next, some crosshatching:
I wanted to add a third hue to this tone-one-tone effect, so I brought in some modeling cream and the stencil from the December kit:
Mix the modeling cream with some Silks Acrylic Glaze:
Love the pearlized look this gives to the ATC:
With the Kraft underneath, the background of the ATC takes on almost a golden shimmer. Then the thicker texturing and edging brings out the full blue color of the Silks. THEN the modeling cream mix adds a pearly, cool-toned hue to the mix.
Fun with Silks, all with just one color! Imagine what you could do once you start mixing and matching with your whole LuminArte Silks color stash.
~Keri
Showing posts with label Atc. Show all posts
Monday, December 23, 2013
Tuesday, August 20, 2013
August Special Guest, Candy Rosenberg, Part Two!
Hello and Happy Tuesday!
Our August Special Guest, Candy Rosenberg is back with a couple more projects! We love ATC's and we are happy she has created more today!
Let's get right to her projects!
I don't know about you, but I am completely hooked on creating ATCs. Aren't these just fabulous?
Thank you again Candy for taking the time to share your talent and creativity with us this month! Please be sure and stop by Candy's Blog and see more of her amazing projects!
Thanks for stopping by! Have a great day!
Our August Special Guest, Candy Rosenberg is back with a couple more projects! We love ATC's and we are happy she has created more today!
Let's get right to her projects!
I don't know about you, but I am completely hooked on creating ATCs. Aren't these just fabulous?
Thank you again Candy for taking the time to share your talent and creativity with us this month! Please be sure and stop by Candy's Blog and see more of her amazing projects!
Thanks for stopping by! Have a great day!
Labels:
ARTChix Studio,
Atc,
August Kit,
Candy Rosenberg,
Guest Designer,
Viva Decor
Saturday, August 17, 2013
ATC Happy!!

Artist Trading Cards are so much fun! There's just something about their size...AND the fact that you can create several in one sitting! They are also very fun to trade. There's something so magical about getting REAL mail in your mailbox...ESPECIALLY when it's a ONE OF A KIND made by hand!
Our August Kit was so fantastic that I got a little carried away creating cards this month. Below are some of the cards I created with a bit of explanation with each one.
First Up, Doodle Cards
The Wooden Whales in our August Kit were SO COOL, they inspired me:)
I Started by applying a few coats of Gesso to the blank card found in the Kit.
At first, I thought I might like a pattern under the Doodled Whale and lettering, but later decided it would "fight" with the drawing. (you can see in the photo above that there is stencil pattern that I covered up later with modeling paste) I used a Faber-Castell black multi-liner XS for the doodle and lettering.
Next I added the Modeling Paste. I have a mini off set spatula from my kitchen that comes in handy for this...but you can use whatever you have on hand (plastic knife, old gift card or credit card, etc.)
Next I gave it some color with my KOI travel watercolor set. Lightly mist the color you want to use and apply the color with a brush to the DRY modeling paste.
The last thing added: Yummy Glitter Paste from our Kit. I really love the consistency of this paste...it's so easy to work with, it just glides on & clean up is easy... AND our kit includes a VERY GENEROUS jar! I suspect that I will be adding this to many of my December Holiday Projects!!
Balloons take flight
I LOVE this background! It came in the kit perfectly sized to fit the blank ATC cards...Just glue and go! I added a little Gesso with my fingers to soften it's appearance and to lighten the background so the "Doodle" would show up.
Doodling is kind of like yoga...it's very therapeutic:) I confess, I often listen to Audio Books while I work...sometimes you can see a sentimental tear on my pages:)
I printed off the sentiments, cut them out and added a touch of yellow using one of my favorite products...see below.
Next Up, vintage fun!
This background was also sized to fit. I love the colors. I added a little of the Neocolor II crayon to the edges, a bit of washi tape to the corner, a "joy pin" with ribbon, a sentiment covered with more of the yellow Neocolor II crayon, a tiny gem & a cute button from the kit. This one came together so fast, thanks to our amazing August kit!
The details of the card above go like this...
I covered the blank card with Gesso. I then stenciled the diamonds with more Gesso and applied the SUPER COOL Viva Inka Gold with a wet brush. What a brilliant product!
I then applied the Sentiment & Ephemera from our Great August Kit. I wanted more of that cute "angel!"
Next, I added the oval stencil and edge distressing with Ranger's DISTRESS INK in Walnut.
Last but not least...my Butterfly Card
I first applied the Inka-Gold to the blank card. Next, I cut the "film strip" from our Kit in half and adhered it to the Dry card with the Studio Multi-Medium.
On a separate piece of Mixed Media Paper, I doodled flowers. I cut this to fit and attached it with the Studio Multi-Medium. (Thank you Tina for exposing me to this AMAZING product!! I'm hooked)
Next, I took one of the "Wooden Windows" from our kit, glued on the Butterfly from the Kit's ARTChix Ephemera sheet, added a little of the Viva Inka-Gold to the edge along with the word "Transformation" that I printed off with my computer, & covered it with "Glossy Accents."
I love how the word looks slightly transparent. This was a happy accident:) I meant to print it off on card stock, but forgot to put a sheet in...I didn't want to waste the print, so I used the word printed off on regular computer paper. Because it is thinner than card stock, the Glossy Accents caused the paper to break down a little, creating this transparent look...I like it!
(not all my accidents are happy ones!)
I mounted the "Window" on a Square of Blue Card Stock to give the ATC a little more color.
As you can see, I had ALOT of fun with the ATC cards!!! Hope you do too! As always, would LOVE to see yours! Post them on our Facebook Page!!
It's an honor to "hang out with you!"
See you soon!
Creatively Yours,
sue
Friday, August 16, 2013
August Special Guest - Candy Rosenberg!
Hello and Happy Friday! We are super excited today as we have a Special Guest, Candy Rosenberg, with us!
Thank you Candy for sharing your amazing talent and creativity with us! Before we get to Candy's first project, let's get to know her a little better!
Candy Rosenberg has been paper crafting since she was a child and comes from a creative family of artists, cartoonist and painters. She has been in the scrapbooking industry since 2007 and during this time has been in online marketing, design and education team coordination, product development and commission work for a number of manufacturers and magazines. There is no mistaking her style; a blend of vintage, shabby chic and mixed media all inked up, fussy cut and layered. When she first started out her style was not like "others," however, no matter what she never compromised her style and now her style is more mainstream than ever. Candy tells us the only reason why she does what she does is to inspire others, teaching is her passion. I would advise not to say "I do not have a creative bone in my body" in her presence! She is known for pulling her scissors, a bit of paper and adhesive out of her purse and perform an impromptu "mini" class to prove to you that every single person is creative...your style is all that you have to practice.
Candy is blessed to still have one teenager left in the home and the creative bug has spread to her and her older sister. The youngest is a duck tape artist and attends CHA with her mother, the oldest daughter is a student at the Art Institute of Portland for Photography and Design (which makes moms job easier with plenty of photos). Not to leave out her son who is in the Navy, he is creatively navigating the waters.
Here's what Candy has to say about the August Kit!
Thank you Candy for sharing your amazing talent and creativity with us! Before we get to Candy's first project, let's get to know her a little better!
Candy Rosenberg has been paper crafting since she was a child and comes from a creative family of artists, cartoonist and painters. She has been in the scrapbooking industry since 2007 and during this time has been in online marketing, design and education team coordination, product development and commission work for a number of manufacturers and magazines. There is no mistaking her style; a blend of vintage, shabby chic and mixed media all inked up, fussy cut and layered. When she first started out her style was not like "others," however, no matter what she never compromised her style and now her style is more mainstream than ever. Candy tells us the only reason why she does what she does is to inspire others, teaching is her passion. I would advise not to say "I do not have a creative bone in my body" in her presence! She is known for pulling her scissors, a bit of paper and adhesive out of her purse and perform an impromptu "mini" class to prove to you that every single person is creative...your style is all that you have to practice.
Candy is blessed to still have one teenager left in the home and the creative bug has spread to her and her older sister. The youngest is a duck tape artist and attends CHA with her mother, the oldest daughter is a student at the Art Institute of Portland for Photography and Design (which makes moms job easier with plenty of photos). Not to leave out her son who is in the Navy, he is creatively navigating the waters.
Here's what Candy has to say about the August Kit!
I squealed when I received this fabulous Frog Dog Studio mixed
media ATC (Artist Trading Card) kit in the mail to create with. I
nearly fainted when I discovered the little wood windows and clear
newspaper print film. My mind went crazy and I got started right away.
Paint the ATC board with
the Inka Gold, covering it thinly to make it appear like it is painted
and swiped on the card. This will create the background.
I placed a piece of the clear film, cut
to size on the back of a wooden window pane. Cut a square hole in the
ATC card so that you can see through the window. Hand cut the angel
from the printed sheet and added with Scrapbook Adhesives by 3L 3D Foam
dots stacked two high so that it sits even with the window pane.
Add the wings from the same sheet using the same technique of stacking the foam dots.
Add May Arts burlap twine and laser cut anchor to create the final look
I love the vintage nautical feel of the finished Artist Trading Card.
That is such a wonderful project! Thank you Candy! Be sure and stop back next week for another project from Candy. We can't wait! Please stop by Candy's Blog and say hi!
We hope you have a wonderful weekend!
Labels:
ARTChix Studio,
Atc,
August Kit,
Candy Rosenberg,
Guest Designer,
Viva Decor
Monday, August 12, 2013
ATC Craze!
Messy & colorful makes me happy!
Hey crafters Rita Barakat here!
Are you loving ATC'c yet?
Sometimes I like doing something really small,
Atc's are perfect becasue they get your creative juices flowing
and you can start and finish them in one sitting!
Which also makes me happy!
I used this months Frog Dog Studio kit for my ATC's -
this one has the card, Viva Glitter paste, and ARTChix Ephemera Sheet.
I also melted Faber-Castell Design Memory Paper Crafter Crayons on here!
More ARTChix Ephemera Sheet, some Viva Stone Effects for sand.
More glitter paste for her tail!
The white on the edges is Ranger Distress Paint Daubber.
I made many layers here with lots embossing powder!
So have you made any ATC's?
Leave me a link I wanna see!
Labels:
ARTChix Studio,
Atc,
August Kit,
Distress Paint,
Frog Dog Studio Kit,
Glitter Paste,
Rita Barakat,
Viva Decor
Sunday, August 11, 2013
August Challenge - ATC Style!
Hello and Happy Sunday! Tina here today with a new Frog Dog Studio challenge. We had so much fun with our Distress Paint challenge last month, we thought we'd have another this month! We hope you play along.
Using our August kit as inspiration, our August Challenge is all about ATC's!
Here are the details:
1. Create an ATC card using any medium.
2. We love to see new and fun ways to use product, so if you have discovered a great new secret, please share it with us.
3. A randomly chosen winner will receive a $10 Gift Certificate to the Frog Dog Studio store.
4. You may enter as often as you want, but each entry must include a new project.
5. The use of the Frog Dog Studio August kit is not a requirement, but is appreciated!
6. The challenge will close on August 25th and the winner will be announced shortly after that.
7. We will share the winning project on the Frog Dog Studio blog, so be sure and stop back.
8. Link up your entries below, with the InLinkz tool.
Happy Creating!
Using our August kit as inspiration, our August Challenge is all about ATC's!
Here are the details:
1. Create an ATC card using any medium.
2. We love to see new and fun ways to use product, so if you have discovered a great new secret, please share it with us.
3. A randomly chosen winner will receive a $10 Gift Certificate to the Frog Dog Studio store.
4. You may enter as often as you want, but each entry must include a new project.
5. The use of the Frog Dog Studio August kit is not a requirement, but is appreciated!
6. The challenge will close on August 25th and the winner will be announced shortly after that.
7. We will share the winning project on the Frog Dog Studio blog, so be sure and stop back.
8. Link up your entries below, with the InLinkz tool.
Happy Creating!
Friday, August 9, 2013
August ATC Fun - Keri
Along with the rest of the design team, I just cannot get ENOUGH of ATC-making with the gorgeous August Kit!
Here's another look at the ATC trio I created with this kit:
The Maya Mist from the August Scrapbooking Add-on pairs so well with the Inka Gold + Glitter Paste. I love how well the clear glitter paste takes on the blue color of the mist!
If you haven't jumped into the fun world of ATCs yet, I urge you to give it a try...these bite-size art pieces are such a blast to make.
Here's another look at the ATC trio I created with this kit:
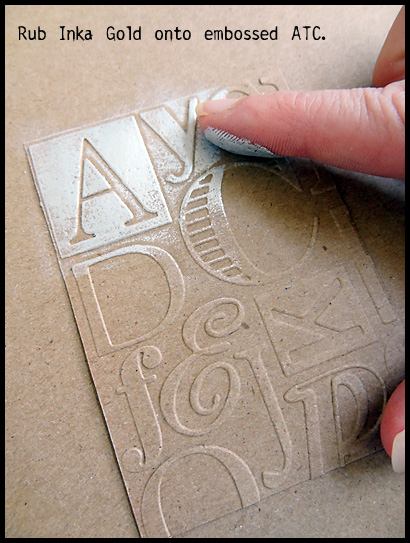
And here is a step-by-step look at the process as I add another ATC to this series.
The Maya Mist from the August Scrapbooking Add-on pairs so well with the Inka Gold + Glitter Paste. I love how well the clear glitter paste takes on the blue color of the mist!
If you haven't jumped into the fun world of ATCs yet, I urge you to give it a try...these bite-size art pieces are such a blast to make.
Labels:
Atc,
august,
Embossing,
Glitter Paste,
Inka Gold,
Keri Babbitt
Subscribe to:
Posts (Atom)