Showing posts with label Inka Gold. Show all posts

Friday, August 23, 2013

More ATC Card Fun!

Have you been having fun with this monthly kit...Martha Richardson here with another look at creating ATC Cards. They are such fun...little miniature pieces of art.


Let's take a look at how I start my creative process.

 I keep a scrap box of leftovers scraps from other projects...I throw the scraps in a box knowing that someday something will be perfect for some project. I play around with what I've chosen to work with and arrange and re-arrange until I'm happy with the composition. This is an evolving process & I don't rush it. I leave it out and as I walk by I look...I change...I look...I re-arrange. When I'm pleased I move onto the next step!

You will see in the next photos how I put one of the ATC cards together.


Once started it is hard to stop creating these fun cards. I find that ATC cards are great stash busters. I keep referring to this but I know that we all have paper issues {LOL} and I'm also finding a way to break that stash up!

Thanks for stopping by. Lots more this month so make sure you stop back and see what the other Design Team members are up to!!!


Thursday, August 22, 2013

August Guest Designer - Emilia van den Heuvel!

Hello and Happy Thursday!  We are very excited today as we announce another fabulous Guest Designer for August, Emilia van den Heuvel!

Thank you Emmy for sharing your amazing talent and creativity with us!  Before we get to her first project (which you will love), let's get to know her a little better!


Short Bio:
My name is Emilia van den Heuvel. I’m a Bulgarian girl, living and working out of the Netherlands. I grew up in the beautiful capital of Bulgaria – Sofia and being a city girl is kind of in my blood. My mom filled our house with books and painting and art journals and she thought me to love all things crafty and artsy.
Before I moved to the Netherlands to be with my husband, I was working as a vet and now I’m a part-time translator, a full-time mommy to my amazing munchkins – Theo and Elise and a passionate crafter. In my spare time you will find me behind my crafty table, reading a book or visiting the next magical place with my family.
I started scrapbooking in 2004 after my first child was born. I think it is the perfect way of preserving our memories. Every single one of my pages is telling a story, which will always remind my children who they are and who we were as a family.
I'm so honored to be Guest designer for Frog Dog Studio kit in August and I want to thank Tina for giving me this amazing opportunity! 

Let's get to Emmy's first project!

Hello Frog Dog Studio friends!

This month I have the honor to be a Guest Designer for Tina’s AMAZING Mixed Media kit. The moment I saw the amazing product combination, that Tina put together, I knew exactly what I will do with every single item in the kit.

Today I would like to share my first project with you – ENJOY YOUR LIFE –


And here is how I did it:

I started with a white cardstock, metallic paint and a brush.


Using a metallic paint made my background pearly and shimmering, which was exactly what I needed, because I wanted to match the fantastic Glitter Paste from the kit.


After the blue paint was dry I began altering my background by adding extra dimension to it – with the glitter paste and The Crafter’s Workshop template included in the kit:


… and with the VIVA Inka Gold paste and the same mask:


Both products are easy to work with and the effect is amazing! You can use them as modeling paste to create dimension or as a covering medium to draw and color.

After the glitter and the Inka Gold were dry I added Silver Paint Dabber as a frame around my background. But because the color was too dark for my taste, I rubbed extra Viva Inka Gold Platinum on top.


Then I started working on my embellishments. I used the two book pages and a flower stencil to create my flowers.


I crumbled the petals and added a pearly brad in the middle to finish them off.


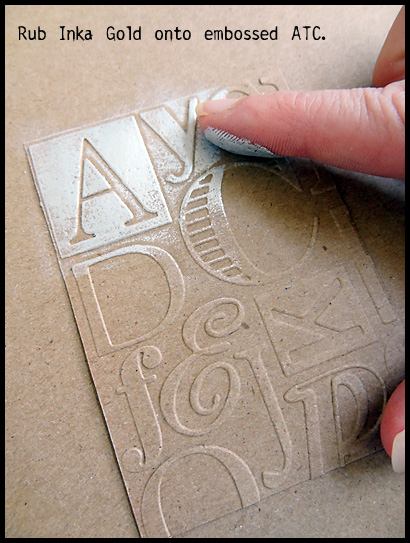
For the frame under my picture I used 4 ATCs {incl. in the kit}. I attached them together and rubbed their edges with VIVA Inka Gold.


When the paint was dry, I adhered my picture on top of the ATC frame and rubbed some more Inka Gold color to mask the edges.

For the small blue flowers I used the flower ribbon included in the kit.


I fussy cut some of the ephemera pictures and added them to my layout.


The wooden embellishments included in the kit are also fantastic! They can be used on any projects and because they are already painted and altered you can attach them just as they are.


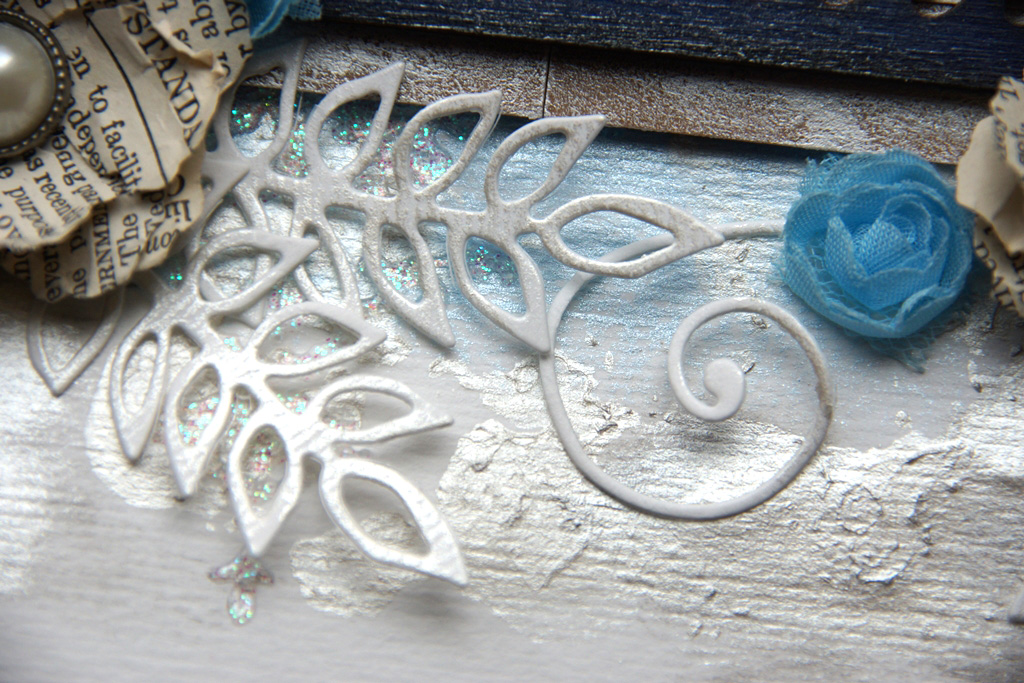
To decorate my flowers I die cut different sizes swirls and leaves from white cardstock. I rub them with Viva Inka Gold to give them a light silver shimmering layer.


For my title I used one of my favorite quotes. I printed the words on white cardstock, cut the lines out and distressed the edges with blue ink. Because the color was a bit darker than I expected I added a layer of Inka Gold on top.


As you can see the possibilities with the August Kit are endless. And I didn’t use even the half of the included materials!

I hope I managed to inspire you a little with today’s post!

Have a wonderful messy day!

Hugs ‘n smiles,
Emmy

What a stunning and beautiful layout Emmy!  Thank you! Be sure and stop back later in the month for another project from Emmy.  We can't wait!  Please stop by Emmy's Blog and say hi! 

Thanks for stopping by!


Friday, August 9, 2013

August ATC Fun - Keri

Along with the rest of the design team, I just cannot get ENOUGH of ATC-making with the gorgeous August Kit!

Here's another look at the ATC trio I created with this kit:


And here is a step-by-step look at the process as I add another ATC to this series.


The Maya Mist from the August Scrapbooking Add-on pairs so well with the Inka Gold + Glitter Paste.  I love how well the clear glitter paste takes on the blue color of the mist!

If you haven't jumped into the fun world of ATCs yet, I urge you to give it a try...these bite-size art pieces are such a blast to make.


Tuesday, August 6, 2013

The Mermaid and The Whale

Lea here, one of the new Design Team members, bringing you my first tutorial post!  The August kit is so yummy!

ATC's are very popular and an easy way to create small works of art to trade.  Lots of embellishments jam packed on this project!

Supplies:

August Kit -


Everything used except anchor, and all collage images.

Other Supplies:
Sakura of America Expressionist Oil Pastels
Helmar 450 Quick Drying Adhesive
Scissors


1. For the background of this ATC, first use the light blue oil pastel stick and color thickly on a small area of the surface. Use your finger (the oils help move the creamy oil pastel) and move the color around to fill up the space. You may need to do this a couple times to fill the area. Also color the wood wave full strength with royal blue oil pastel.

Here is a picture of how you spread the oil pastel, this is from another project I created.NOTE: A light touch is all you need to spread the oil pastels. A bandaid or blending stub can be used as well.


2. Layout your design in the way you might want it to look. You can always change it as you create. I do many times!!


3.  Add royal blue oil pastel as the waves.  Color this like coloring book and just blend slightly.  Add some Glitter Paste in the background and on the bottom of the waves for foam.  Be sure to leave an area on the left side without glitter so you can collage the girl image.


4.  Cut out girl, and collage her to the ATC using adhesive.  Press from the center out to make sure image is smooth and completely flat on surface.

Adhere waves, frame box, and Whale.  Let adhesive set up.  With your finger edge the whale in Inka Gold (color is Silver).  Do not add Inka Gold to the whales nose unless you like that effect.


5.  Cut one of the buttons in half, and one half to create the water coming out of the blow hole.  Any heavy duty crafting scissors will work.  Those are floral wire scissors in the picture, but metal craft scissors or wire scissor should work.


6.  With the same scissors cut the "circle" shape off of the blue anchor.  Adhere to ATC and when dry add Glitter Paste.

7.   To finish the project, cut a small square and the film strip and adhere to the lower left of the girl.  On top of that adhere one of the roses - cut it off the strip with some tulle left.

Small works of art are just as relevant as big works of art.  Have fun experimenting and Playing!!!

Cre8tivelea Yours - Lea

Friday, August 2, 2013

Special, Special! Read All About It! Paper Add On kit for August!

Hello and Happy Friday!

Tina here today with a short, quick post!

We LOVED the August so much, we really wanted to expand your creative options and crafting desires....so for the month of August, we included a Paper Add On Kit!

 
If you are a hardcore scrapper, this kit is perfect for those summer time layouts.  If you are a Mixed Media scrapper, this collection is great for creating those off the page canvases and mixed media projects.  If you are a mixed media artist, this collection is a great way to expand your mixed media options with the Maya Mist, Inka Gold and Stickles.  Just think of the amazing projects you can create by adding the 2 kits together.

Keri and myself created several layouts using the Paper Add On kit to get your mojo started!  Let's check 'em out!


Aren't the colors, embellishments, and mixed media product simply yummy?

The Paper Add On kits are limited in quantity so if you want one, you better act quick!

That's all for today!  I hope you have a wonderful weekend!  Thanks for stopping by!