Showing posts with label June Kit. Show all posts

Friday, June 28, 2013

From nothing to something...

Hello and Happy Friday!

Tina here today with a mixed media layout using items from the June kit. 

One of my favorite ways to create a scrapbook layout is by starting from nothing and ending with a mixed media project that is unique and one of a kind.  There is something exciting about adding paint, ink, ephemera, and little bits and pieces to a sheet of chipboard to create a fun, unique, and interesting background.  I will walk you through how I created this layout.


To start, find a scrap piece of chipboard, or use a standard 12x12 sheet of chipboard. 

You will also need the sewing pattern tissue paper and envelope from the kit.


Crinkle several pieces of the tissue paper and apply to chipboard with matte medium (or Mod Podge)


Dry completely.

Next, apply either spray Gesso or liquid Gesso to chipboard and dry completely.


Look at that fabulous texture the crinkled tissue paper creates.  This will look great when you apply paint and ink to the background.


Then liberally apply Twinking h20 watercolor paint (from the kit) to the background, allowing the paint to seep in and around the creases and folds.  You can also splatter drops of watercolor paint to the background and let the paint drip down the chipboard.


Once the watercolor paint is dry, using the Frog Dog Studio exclusive stencil, spray mist onto the background.


To finish the background, I added rips sections from the sewing pattern paper to the right side of the page by simply adhering the paper to the chipboard with my fingers and Gesso.  I wanted some of the words and design from the envelope paper to peek through, so I wiped off the Gesso to reveal the paper below. 

I then dripped several drops of blue alcohol ink to my craft mat and dipped my finger into the ink.  I smeared the alcohol ink onto the background and mixed some of it with Gesso to soften the color.

I also applied more watercolor paint and let it drip down the background.


To complete my layout, I applied Gesso to the wooden title and once dry, applied red alcohol ink. 


Lastly, I wanted to use some of the twine from the kit, but wanted a deeper blue, so I 're-colored' the twine with blue alcohol ink.  I stapled the twine to the background and added my photo and the layout was done!


Here are some close-ups of my layout.


Next time you want to create a layout entirely from scratch, pull out your Frog Dog Studio kit and create something fun, unique and one of a kind.  Be You!

Thank you for stopping by!  Enjoy your weekend and Happy Crafting!


Wednesday, June 26, 2013

Mini Canvas Fun with Twinkling H2Os and Alcohol Ink

Hello creative souls...today I'm going to share my third project created from the June Kit. I had so much fun creating this mini canvas, these small canvases rock and I'm going to add them to my collection of MUST HAVE products. So let's get started!


PREPARING CANVAS
When I prepare a canvas I want to create as many layers as possible...it adds depth and interest to your creation. Since these are small canvases adding just the paper pattern to it is perfect.

ADDING COLOR
For the next step of adding color I had to create a new sample as I lost the photos of the original canvases. This will not go to waste as I already see the sample in another project. Further down this post you will find tips on working with Twinkling H2Os.

ADDING DESIGN
I love this step...I call it my stash buster step! Working on projects such as this really helps use up all those wonderous things that you bought yet haven't used. The 3rd photo is from the actual completed mini canvas project.

ADDING TEXTURE
Let your imagination go on this...look around the house to see what can be used for this step. I never throw away any plastic cards as I'm always looking for something to scrape paint or modeling paste on {pssst....a little birdie told me that you will see some of these products popping up in future kits}.

ADDING EMBELLISHMENTS
Another stash buster using remnants from other projects...fabric flowers, brads, wood shapes, etc. The 3rd photo shows my completed mini canvas project on top of my sample canvas....hmmmm...that might work.

LUMINARTE TWINKLING H2Os
When I first tried TWINKS years ago I wasn't overly impressed...then I took a class and learned the most 
important step which I'm sharing with you now. 
The only problem is now I need all the TWINK colors!


Let me just say that this June kit is fabulous...I had more fun creating my 3 projects with it. For this project I used 7 of the 8 products. I love the fact that I had at my disposal everything I needed...no running to the store or ordering online...they were all here in this kit!

Thanks for stopping by and allowing me to share with you. Stay tuned for the July Kit...I can't tell you anything but it is fabulous! 


Wednesday, June 19, 2013

Arsty secrets revealed!

 Hey there arsty peeps Rita Barakat here today at Frog Dog Studios!
Today I have some tips that you may or may not know about art journaling
...artsy secrets!Shhh!
If you new to art journaling- the great thing is anything goes, it's YOUR journal so make it your way.
If you want to draw, or collage, write or use symbolism instead it's all up to you! 
You may have a purpose for your journal- a theme so to speak. I created this one for faces.
I used to not like drawing people- more like cutesy characters and such, but now I LOVE it.
So maybe your journal could be a challenge for you; something that you are working on?
Maybe you have not dabbled in mixed media yet (what??!!) and it is a challenge for you?
A small art journal would be a good place to experiment with different mediums
(in a kit perhaps?)
and then when you love it (and you will) you can
incorporate it into your other work!
 
Journaling: Maybe you are not comfortable journaling.
Ideas- use "journal prompts" in a search engine- there are tons of sites
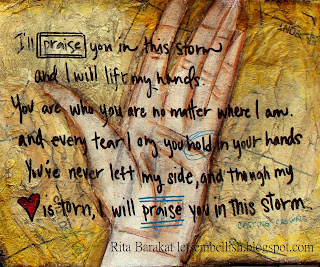
dedicated to this purpose. You can use a part of song (as I did here) or
if it gets too personal hide it behind paint after you are done or put it in a pocket
or use symbols instead.  For me I needed this hand, not only because it
goes with the song, but it represents giving up myself  and my agenda
for something bigger.

Trying something new: Whats the worse that can happen? You don't like it? 
Keep working on it- change it up or cover it with gesso!
(Gesso is your friend! LOL!)
My base for this layout is sewing pattern in June's Frog Dog Kit.
I used a thin layer of gel medium and then the paper, in crinkled up a bit and
I love the texture. In my previous project I used alcohol inks to color the paper, this
time I left a lot of it alone, adding gold color (Twinkling H20's in the kit) to highlight certain areas.

Perfection: (In my best Italian accent) Forget about it!
I am VERY critical of my work- it takes me a long time going over something until 
I am OK with it. Trust me this is not the way to go! Something I have to remind myself
(especially when drawing people) is that nobody looks perfect so why
am I trying to draw perfect people?
If I get caught up in the "perfect page" I take the fun out of it.
And it is fun so just go for it! So what are you waiting for???
Go create something already! :)


Monday, June 17, 2013

How to Create a Tag from Acrylic

Hello creative souls...Martha Richardson here. By this time you have received your June Kit and hopefully broke into the supplies and started creating. I'm so excited to share with you today a project I made from the piece of acrylic plastic and the Dockside Picnic Alcohol Ink set that came with the June Kit from Frog Dog Studio. Here is the finished tag and this photo shows the translucent qualities of using it as a tag.


So let's get started. Why use alcohol inks...because they are awesome!

The hardest decision was what to do with the acrylic sheet. Once the lightbulb went on then I knew that I would turn it into a tag with some help from my Vagabond.


 I didn't end up using this metal token but here is the process I used to give it color.

So there you have it! There is enough of the acrylic sheet left to create a small gift tag. I hope you will give this a try...if you do let me know how it worked for you!


Wednesday, June 12, 2013

Two-fer Wednesday!

Hello and Happy Wednesday!

Tina here today with a Two-fer!  Today, I'm going to share tips and hints for 2 different projects, using alcohol ink.

Alcohol Ink is one of my favorite products.  It is very versatile and has a wide range of colors.  It lasts FOREVER and dries immediately.  I love this about it.

My first project is a super fast and super easy art display/inspiration piece.  You will need the following items to complete this project:


1.  Alcohol Ink
2.  Scrap plastic, transparency, or glossy paper
3.  Straw
4.  Frame
5.  Twine


Let's get right to the tutorial!


Here are some close-ups of this funky, unique, and one-of-a-kind art!


To finish my art, I typed a wonderful quote and adhered it to the frame.  It reads:

"Mere color, unspoiled by meaning, and unallied with definite form, can speak to the soul, in a thousand different ways.      Oscar Wilde"

I thought it was appropriate for the explosion of color in my piece.

For my second project, I share how to create an interesting and unique art journal page using alcohol ink and plastic wrap.

Here's a peek at the page and some close-ups to get you started.


Whew....you stuck with me till the end.  :)

I hope you enjoyed the inspiration today!  I would love to see what you create with your kit and with alcohol ink!  Please share your projects on our Facebook page!

Thank you for stopping by!  Have a fabulous Wednesday!