Good morning, Melissa here with my tutorial on how I altered the cute little box from our July kit.
I love quotes. They make me feel good. I usually try and incorporate them into my journal pages and other mixed media pieces. This little box was no exception. The birds from the Artchix collage sheet inspired me to find a perfect quote. I was thinking of my sister at the time. She's was going through a rough patch and I wanted to send some healing and positive thoughts her way. With this in mind I went to work on altering the box first.
The first thing I did was cut patterned paper to line the entire inside of the box. I used the Claudine Helmuth matte medium to do this. I should say here that I love this stuff! It goes on wonderfully smooth, adheres well without making your hands all sticky, and has no odor that I could detect. The last thing is very important to me, as I have young children who are almost always in the room with me when I'm creating. When that was complete, I marked the edges of the box and attached the Tim Holtz hinges. Then I wrapped the edges of the inside lid with the Prima washi tape to cover the brad prongs.
The next step was to cover the lid and sides using the Ranger paint dabbers. I just dabbed and mixed with the end of a dry paintbrush until I got a nice distressed finish. I also added some paint to the hinges. Then I created a mini collage using the Artchix clip art and a few bits of washi tape. Over the top I added the crackle finish and the little cabochon (from my stash) in the corner. I also used some leftover paper twine from the June kit to make the little bow. Everything was adhered using the matte medium from the kit.
I continued to collage the other sides of the box, using some papers from my stash, the paint dabbers from the kit, and washi tape.
I got all of the little cards together that fit inside of the box and laid them out. I decided to do little mini collages for each one, add a quote, and tie them all together like a fold out banner. Using the paint dabbers I started creating the background for each one. I then cut out images from the clip art sheet and inked all of the edges using Distress Ink in Vintage Photo (a favorite of mine for sure!). I also used the Prima washi tape and a roller stamp to tie all of the pieces together. I made sure to use the same basic materials for each mini collage, but added something a little different for each one. I wanted it to have a cohesive look. I found a quote that I liked, printed it out, and cut it up into smaller bits to add to each piece.
To finish off the mini banner, I collaged some inspirational words that I cut out from a thesaurus and glued them to the backside of the squares. I punched holes in the pieces and tied them all together, again using the leftover twine from the June kit. I also inked around the edges using the green paint dabber.
And here is the final product!
Thanks for stopping by--have fun creating! :)
Showing posts with label Ruby Rock-It Paper Twine. Show all posts
Wednesday, July 3, 2013
Wednesday, June 26, 2013
Mini Canvas Fun with Twinkling H2Os and Alcohol Ink
Hello creative souls...today I'm going to share my third project created from the June Kit. I had so much fun creating this mini canvas, these small canvases rock and I'm going to add them to my collection of MUST HAVE products. So let's get started!
PREPARING CANVAS
When I prepare a canvas I want to create as many layers as possible...it adds depth and interest to your creation. Since these are small canvases adding just the paper pattern to it is perfect.
ADDING COLOR
For the next step of adding color I had to create a new sample as I lost the photos of the original canvases. This will not go to waste as I already see the sample in another project. Further down this post you will find tips on working with Twinkling H2Os.
ADDING DESIGN
I love this step...I call it my stash buster step! Working on projects such as this really helps use up all those wonderous things that you bought yet haven't used. The 3rd photo is from the actual completed mini canvas project.
ADDING TEXTURE
Let your imagination go on this...look around the house to see what can be used for this step. I never throw away any plastic cards as I'm always looking for something to scrape paint or modeling paste on {pssst....a little birdie told me that you will see some of these products popping up in future kits}.
ADDING EMBELLISHMENTS
Another stash buster using remnants from other projects...fabric flowers, brads, wood shapes, etc. The 3rd photo shows my completed mini canvas project on top of my sample canvas....hmmmm...that might work.
LUMINARTE TWINKLING H2Os
When I first tried TWINKS years ago I wasn't overly impressed...then I took a class and learned the most
important step which I'm sharing with you now.
The only problem is now I need all the TWINK colors!
Let me just say that this June kit is fabulous...I had more fun creating my 3 projects with it. For this project I used 7 of the 8 products. I love the fact that I had at my disposal everything I needed...no running to the store or ordering online...they were all here in this kit!
Thanks for stopping by and allowing me to share with you. Stay tuned for the July Kit...I can't tell you anything but it is fabulous!
Friday, June 21, 2013
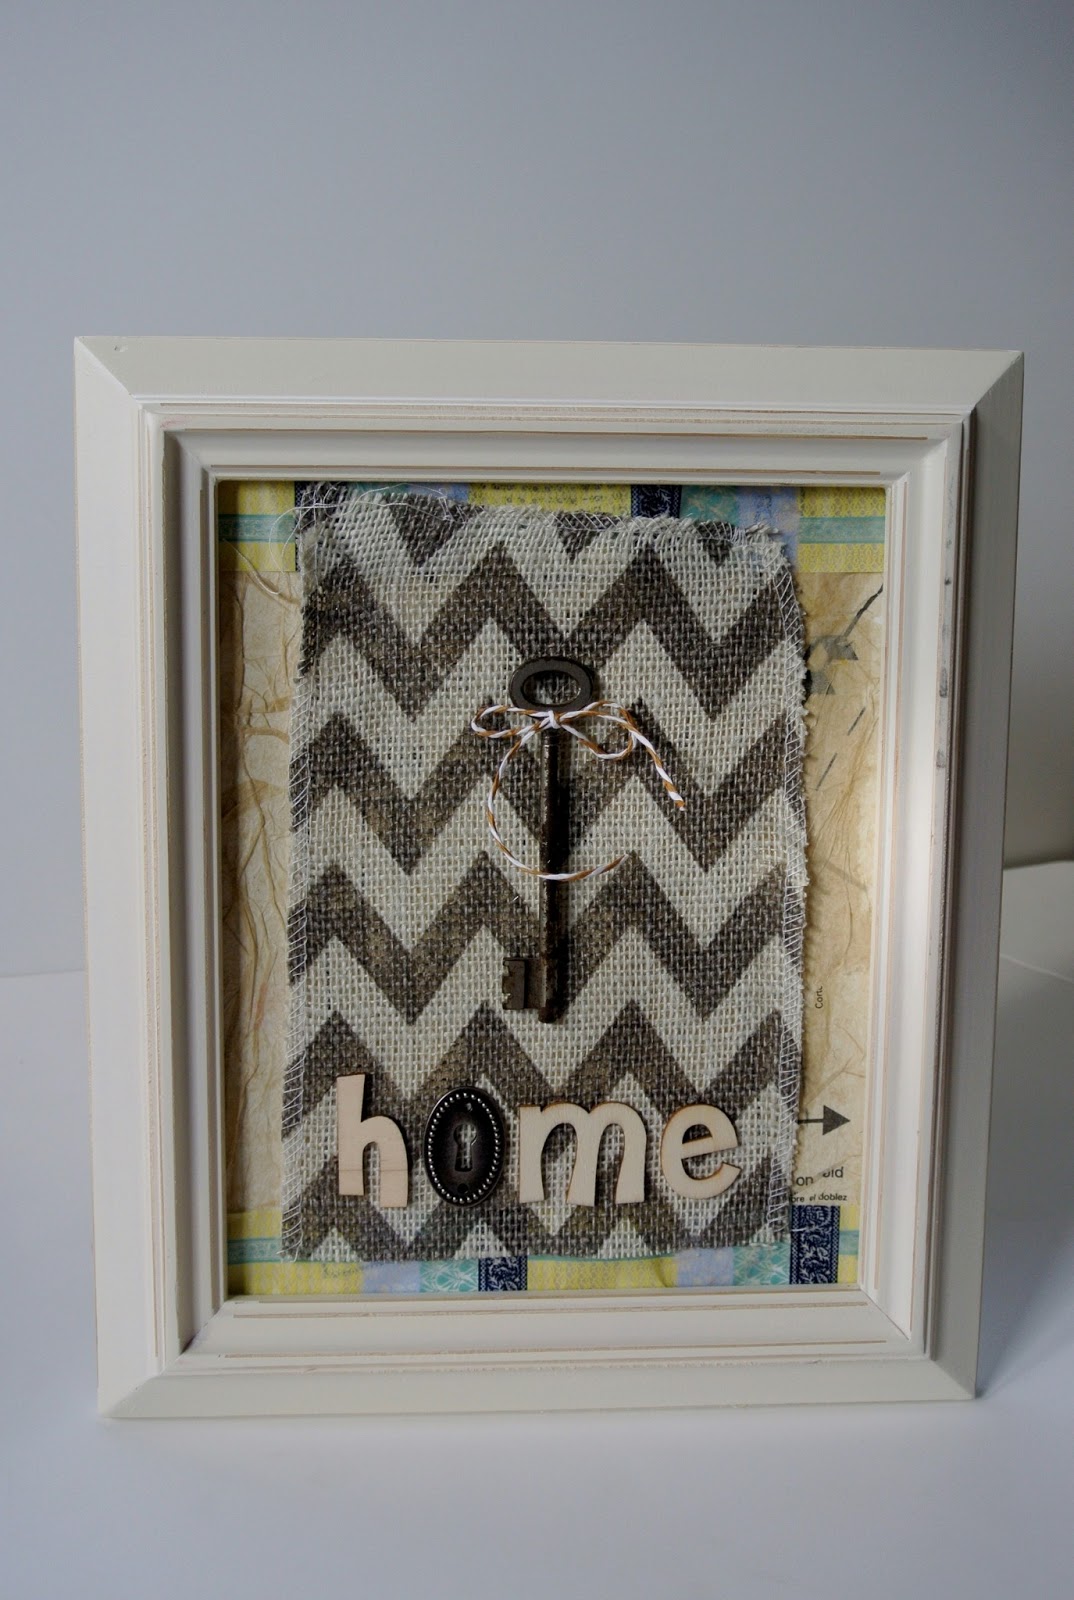
How to Create a Quick Trendy Piece of Home Decor
Hello all! Melissa back again one last time this month with another project I created using some of the materials from our June kit.
This is a really fast, easy project. Sometimes I enjoy making little things for around the house. This project was inspired by an antique key that I had bought at an architectural salvage shop. I have a love for all things old, so I thought it would be fun to incorporate some new materials with that to keep it trendy (ex: burlap, chevron)
Step 1-Cover a piece of heavy watercolor paper with the sewing pattern from the kit using Mod Podge.
Step 2-Use washi tape at the top and bottom to create a border.
Step 3-Cut a piece of chevron burlap to fit in the center of the page. I bought mine at Hobby Lobby when it was on sale. :) Attach to the paper using hot glue.
Step 4-I glued the antique key onto the burlap using hot glue and tied a little bow with the paper twine and also attached to the key using hot glue. I used the cute wooden letters from the kit to spell out "home". Then, on a whim I decided to substitute the "o" in home with a little keyhole from Tim Holtz that I found in my stash. I thought it went well with the key idea. Here is the final project, with a few close ups:
And on display on my buffet, along with my sweet great grandparents wedding photo :) :
Thanks for stopping by!!
This is a really fast, easy project. Sometimes I enjoy making little things for around the house. This project was inspired by an antique key that I had bought at an architectural salvage shop. I have a love for all things old, so I thought it would be fun to incorporate some new materials with that to keep it trendy (ex: burlap, chevron)
Step 1-Cover a piece of heavy watercolor paper with the sewing pattern from the kit using Mod Podge.
Step 2-Use washi tape at the top and bottom to create a border.
Step 3-Cut a piece of chevron burlap to fit in the center of the page. I bought mine at Hobby Lobby when it was on sale. :) Attach to the paper using hot glue.
Thanks for stopping by!!
Friday, June 14, 2013
How To Create a Mini Mixed Media Canvas
Hello everyone, Melissa here with a tutorial on how to create a mini mixed media canvas using items from our June kit.
Step 1-ink the canvas. I used Dylusions spray inks (Lemon Zest, Pure Sunshine, and Post Box Red) and the red alcohol ink from the kit, then used Ranger Alcohol Blending solution to let it all drip and run together. This product is great to use with the alcohol inks!

Step 2-Using the exclusive Frog Dog Studio stencil, I applied modeling paste with the edge of an old credit card to create a raised texture on the canvas.
Step 3-Thoroughly wet a paint brush with water and dip it into the Sparkling H2O. Cover the entire canvas. It colors the modeling paste nicely, and adds another layer of color to your background.

Step 4-Using the paper twine, secure the end on the back side of the canvas with a glue dot, then wrap it around the edge of the canvas a few times, ending at the back and securing that end with another glue dot.
Step 5-I created the flower using a technique learned from Christy Tomlinson. Take a coffee filter and use stencils and spray ink to add a pattern to it. Then, using gel medium (mod podge will not work for this) attach the coffee filter to a piece of foil. The foil is then moldable, which makes it really fun to work with. I cut the pieces into petal shapes and assembled them into a flower, using gel medium to attach it to the canvas. Then I took some of the paper twine and wound it into a circle to create the center of the flower.

Step 6-I tore off bits of the sewing pattern and attached those to the canvas for some added visual interest. I also added a little bit of stamping using a patterned stamp and StayZ on ink in black. I dotted on some of the Sparkling H2O on the sewing pattern to tie it into the background.

Step 7-While all of that was drying, I set it aside and started on the little easel. I used the blue alcohol ink to color the entire thing. One thing I love about alcohol ink is that it dries very fast. When that was done, I covered a small area with some white gesso. This is where I used some little letter stamps to stamp out a quote that I like. I am addicted to letter stamps, you can get them in all kinds of fonts and look great in your art journal.


And here is the final product and some close ups:
Thanks for stopping by! Melissa
Step 1-ink the canvas. I used Dylusions spray inks (Lemon Zest, Pure Sunshine, and Post Box Red) and the red alcohol ink from the kit, then used Ranger Alcohol Blending solution to let it all drip and run together. This product is great to use with the alcohol inks!
Step 2-Using the exclusive Frog Dog Studio stencil, I applied modeling paste with the edge of an old credit card to create a raised texture on the canvas.
Step 3-Thoroughly wet a paint brush with water and dip it into the Sparkling H2O. Cover the entire canvas. It colors the modeling paste nicely, and adds another layer of color to your background.
Step 4-Using the paper twine, secure the end on the back side of the canvas with a glue dot, then wrap it around the edge of the canvas a few times, ending at the back and securing that end with another glue dot.
Step 5-I created the flower using a technique learned from Christy Tomlinson. Take a coffee filter and use stencils and spray ink to add a pattern to it. Then, using gel medium (mod podge will not work for this) attach the coffee filter to a piece of foil. The foil is then moldable, which makes it really fun to work with. I cut the pieces into petal shapes and assembled them into a flower, using gel medium to attach it to the canvas. Then I took some of the paper twine and wound it into a circle to create the center of the flower.
Step 6-I tore off bits of the sewing pattern and attached those to the canvas for some added visual interest. I also added a little bit of stamping using a patterned stamp and StayZ on ink in black. I dotted on some of the Sparkling H2O on the sewing pattern to tie it into the background.
Step 7-While all of that was drying, I set it aside and started on the little easel. I used the blue alcohol ink to color the entire thing. One thing I love about alcohol ink is that it dries very fast. When that was done, I covered a small area with some white gesso. This is where I used some little letter stamps to stamp out a quote that I like. I am addicted to letter stamps, you can get them in all kinds of fonts and look great in your art journal.
And here is the final product and some close ups:
Thanks for stopping by! Melissa
Monday, June 10, 2013
Love Canvas
Hello artsy divas! Rita Barakat here with my first post at
Frog Dog Studio!
Frog Dog Studio!
Woot!
I love the idea of a Mixed Media kit because you always
know you are going to get something (hopefully) that you''ve never worked with,
or something you've wanted to work with but haven't picked up yet.
know you are going to get something (hopefully) that you''ve never worked with,
or something you've wanted to work with but haven't picked up yet.
I also love challenging my self to use EVERYTHING in the kit. This was the result!
That's my baby girl (a couple if years ago)and she looks darling on this little canvas!
First impressions:
This was my one thing in the kit that I thought,
"what am I going to do with that?"
Now that I've used it I am thinking,
"COOL! What else can I use this on?
The process:Tear a piece of the pattern big enough to cover your canvas
crinkle it up into a ball and flatten it back out (see the wrinkles?).
Use *heavy gel medium to adhere it to the canvas, tucking in any edges underneath.
*The reason I prefer using heavy gel medium on my projects is you you get full coverage
and it is not runny & messy like glue. Once it dries you can paint it
sand it whatever- it's not going anywhere! I like this for pictures on projects too, because there is not bleeding or distortion of the image.
Then I used the gel medium to adhere my picture and letters into place.
And I added more texture ( I know its hard to see but I promise its there) by using the stencil
to add random triangles over the piece with the gel medium. I am using the gel medium
because I know later I am going to use alcohol inks and they like a non porous surface.
I used the blue and green Alcohol inks over the entire surface,
once dry, I added the twinkling H2o watercolor paint in various places.
I also used the inks on the twine.
Here is a close up!
I love all the wrinkled texture form the pattern!!!
And I love the saturated color!The darker spots are where there was no gel medium!
I cut these angel wings out of the plastic sheet enclosed and
used gold alcohol ink (not in the kit) for polka dots! I added
a little crown - it was silver, changed it with the alcohol inks.
***
I hope you enjoyed this project, I know you will love this kit!
Labels:
3 x 3 Flat Panel Canvas,
Alcohol Ink,
Canvas,
Exclusive Stencil,
June Kit,
Pink Paislee Wooden Alphabets,
Rita Barakat,
Ruby Rock-It Paper Twine,
Sewing Pattern Package,
texture,
Twinkling H20 Watercolor
Subscribe to:
Posts (Atom)


.jpg)
.jpg)