Showing posts with label Martha Richardson. Show all posts

Thursday, December 26, 2013

Luminarte SILKS Acrylic Glaze Sparks Up A Mini Canvas

Hello everyone…Martha Richardson here. I have a quick project to share with you today. I  found a 6x6" mini canvas that I created for a class sample. It wasn't completed but I really loved the colors and design. When I received the SILKS in the Dec. Kit an idea started coming together. It started with the question…how will Silks look on top of other acrylic paints…will it add some pizzazz to the canvas?

The answer is YES to the questions and I now have an art piece that I LOVE!!!

Here is the class sample partially finished…loving the colors!

Silks Acrylic Glaze in African Jade applied in upper left hand corner.
Getting ready to apply Fern and Carmine.
Close-up of Canvas…pretty glimmer!!

Finished 6x6" Mini Canvas

What a difference the SILKS Acrylic Glaze made when added to an already completed canvas…from dull to GLIMMER and SHINE!

I'd like to take this time to thank TIna Walker for believing in me without really even knowing. This will be my last post with Frog Dog Studio. It was a hard decision to make because this Frog Dog Studio, Tina and the design team members seriously ROCK!!!!! I'm freeing up time as my husband and I are putting our house on the market and moving further south.


Friday, December 13, 2013

Coastal Christmas Shadow Box and Splash of Color

Hello …Martha Richardson here to share some FYI on 2 of the fabulous products found in the Dec. Mixed Media Kit from Frog Dog Studio.

What are Luminarte SILKS Acrylic Glaze?
Iridescent
Semi transparent acrylic glaze paint
Vibrant colors

Use on many surfaces ~ wood, paper, canvas

EASY CLEAN UP with soap and water

66 Color choices and can be purchased by:
Individual wide mouthed 1oz. jars or
in sets.


Here’s a great description found on the website:
What makes Silks so special? 
It's the secret mix of mica and other proprietary mineral particles that refract light, like a crystal.

How do Silks work? 
Silks are easy to use paints that create a semi-gloss glaze - not too shiny, not too flat, but just right.
Simply brush Silks onto your project, using a wide brush for broad strokes or a fine brush for details. Or use a brayer if you want even wider swaths of color.
Allow Silks to dry between colors to keep the glaze layers distinct and create depth, or blend the colors while still wet if you prefer that effect.

What surfaces are suitable for Silks?
It's a long list. Silks are formulated for paper, wood, pre-washed fabrics, paper mache, acrylic and other plastics, canvas, gourds, silk and silk ribbon, terra cotta, paper-clay, air-dry clay, air-dry polymer, leather, faux leather, and more.

How long does it take for Silks to dry?
Silks have an extended open time to make them easy to use. They dry faster on paper and other porous surfaces, more slowly on non-porous materials. Thinner applications dry faster than heavier layers. Climate conditions are a factor as well.
Silks are fully cured after 48 hours.

I found another great article that you can read here.

Here is the project I created from the Dec. kit using the Luminarte Silks Acrylic Glaze. I've always wanted to create a coastal themed Christmas Shadowbox since I live close to the ocean.


To add texture TH Distress Crackle Paint was applied.

Getting ready to apply Silks Acrylic Glaze in African Jade.

Applied 2 layers of African Jade.

 Applied African Jade over Block Print letters I created from Grunge Letters and Shapes. 
Before adding color I applied a thing layer Of Viva Colour Modeling Paste in Pearl.

Viva Colour Modeling Cream Pearl applied to metal.
Before and after on metal sea shells.

Completed shells.

What is Viva Colour Modeling Cream?
 Creates SHIMMERING pearl or metallic 3-D effect.
Easy to Apply freehand with palette knife,
sponge or use with stencils.
Use on various materials:
chipboard
wood
glass
styrofoam
ceramics

Thanks for stopping by! I really appreciate it especially during this Holiday season rush. I'll be back at the end of Dec. to share one more project.

I'd like to take a moment to wish all our readers a Merry Christmas or Happy Holidays…which ever you prefer ;)


Monday, December 9, 2013

Frog Dog Studio and Splash of Color Team Up! (Day One)


Welcome to the Frog Dog Studio and Splash of Color Design Team Cross Promotion!

This week the teams are showcasing projects from the Frog Dog Studio
December Mixed Media kit, featuring Luminarte Acrylic Silks and Viva Colour Modeling Creme.  Both teams are excited to share their kit projects and show you how they were inspired. 

Each day (December 9-11th), on the Frog Dog Studio and Splash of Color Blogs, we will be sharing Design Team projects with tips, how-to's, and Kit and Product shares.  Be sure and visit both blogs for daily inspiration. 

We love Frog Dog Studio kits and Splash of Color product so much, we are sharing them with you!  


Visit the Frog Dog Studio blog and Splash of Color Blog each day and leave a comment for a chance to win the following:

1.  ONE winner will be selected to receive a Frog Dog Studio December Mixed Media.
2.  ONE winner will be selected to receive a $25.00 Luminarte and Viva Colour Prize Package! 

Leave a comment each day on each blog for more chances to win.  You must visit each blog and leave a comment on both blogs in order to qualify for a chance to win. 

Comments are due by midnight MST, Wednesday, December11th to qualify for the drawing.

Winners will be announced shortly after the end of the comment period, so be sure to check back to see if you've won.

Let's see what the Frog Dog Studio team created today!

Design Team member Martha Richardson shares our first project share.  Here's what she has to say!

I would like to share three journal pages that I created using the oh so fabulous Luminarte Silk Acrylic Glazes.  I have to admit that I fell in love with these quite awhile ago and have several colors. I love working with them and the effect they create.

I would love to offer everyone a tip that I learned from several classes with Joanne Sharpe. Basically if you own many different colors in pens, markers, watercolors, SILKS, etc. you should create a tool that allows you to actually see the color on paper…great way to choose your colors and mix and match. It may seem like a lot of work but once completed it is much easier to match colors together.

This 1st journal page is what I created to show all my colors of Luminarte Silk Acrylic Glaze. I created this doodle on Strathmore Watercolor paper and then I drew a grid  of squares around it to use for my color samples. I noted on the back of this page what colors I used and where that color is. The center of the large circle uses the gorgeous AFRICAN JADE color. I wish that you could see the beautiful finish created but it just is so hard for a camera to pick of the glimmer.


The 2nd journal page I used a beautiful stencil, Marrakesch, designed by Michele Ward to create a background around another doodle. Most of the page was done with the Luminarte Silks Acrylic Glazes. The background was painted 1st with AFRICAN JADE Silk and then the second is a mixture of FERN Silk and PRETTY PERIDOT Silk that was added for the frame. I used CARMINE from the kit for the doodle but toned it down slightly with EMPEROR'S GOLD Silk. I wish you could see the African Jade background but again I can't get the colors to read correctly in my photos without altering all the other colors.


My last journal page was another doodle that I had created but never finished and I used this as my jumping off point. I 1st used the Sakura White Glaze Pen from last months kit to write significant words on the background before I painted it with AFRICAN JADE. I purposely added more color to some of the areas to show how Silks can be layered over one another.


I will be back later this week with a regular post that goes into more depth about Luminarte Silks Acrylic Glazes and the Viva Colour Modeling Creme and how it can be used on wood. 

Our next project share is by Design Team member Sue Carroll.  She created an amazing Holiday Project you will simply love!


As a Frog Dog Studio Design Team Member, I have the privilege of receiving amazing mixed media products every month to create with...
This month, our December Kit included Viva Colour Modeling Cream, & several jars of LuminArte Silks Acrylic Glaze.
(along with MANY other goodies of course!)
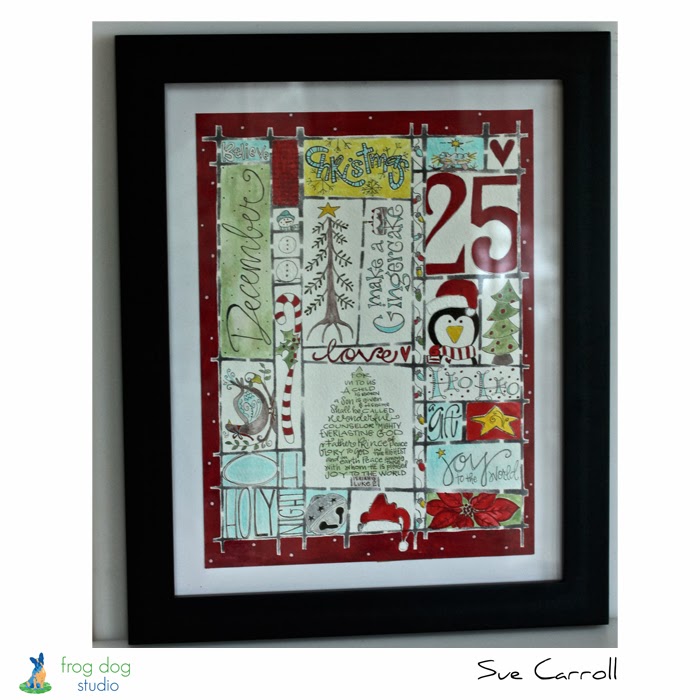
These great products, along with Catherine Scanlon's Grid Stencil (introduced to me through FROG DOG)
 are what I used to create this framed Christmas piece.

I started this project by using black acrylic paint to stencil the "GRID" onto a piece of cold pressed, 140 Lb. Watercolor paper.


Next, I used a pencil to draw each element into the grid areas.
After that, I went over the pencil drawings with one of my favorite pens... Black Pitt multi-liner in XS.


Then, it was time to COLOR!


In the photo above, you can see a close up of the modeling cream added to the fur on the hat.
The red is LuminArte Silk in Carmen.
My photo doesn't do the modeling cream justice, really...below is a photo of the depth and texture you can achieve with this amazing product...


Below, I am sharing some close up shots of this piece, so that you can see the brilliance and intensity
of color that LUMINARTE SILKS provide!


 The SILKS I used in this piece were...
African Jade, Fern, Carmen, & Sunflower.
ALONG WITH
Viva Colour's Pearl Modeling Creme
These amazing products can be found at SPLASH OF COLOR
Inspiration for this piece and more can be found at Frog Dog Studios
 

Amazing Project!  And Amazing Product!  You can tell that the team LOVES Luminarte Acrylic Silks and Viva Colour Modeling Creme.  The used both perfectly.

Be sure and hop on over to the Splash of Color Blog to see what their Design Team is sharing today!

Remember to leave a comment on both the Frog Dog Studio blog and the Splash of Color blog each day for a chance to win!  Stop by tomorrow for more projects from 2 more Designers.


Friday, November 22, 2013

Art Journal Coloring Page and Making Embellishments

Have you enjoyed coloring your Catherine Scanlon Art Journal Coloring Pages? Martha here with an idea of how to use one of your pages to make simple paper embellishments using your favorite punches or die-cut systems.

Here is my finished mini-album. What is hard to see is the thin acrylic cover which allowed me to showcase a sentiment on the underneath page and decorate the cover with other embellishments.


Examples of other interior pages waiting to be completed.

Supplies used from Nov. Kit:
Catherine Scanlon Art Journal Coloring Page
Niji Pearlescent Watercolor Pallette
Sakura Gelly Pens ~ Souffle, Metallic & Glaze

Thanks for stopping by. I know that I'm busy getting ready for the upcoming holidays and I'm sure you are also! I'll be back in Dec. with new projects from the upcoming Frog Dog Studio Dec. Kit…you are going to want this kit {of course I say this every month}.


Friday, November 8, 2013

Have You Ever Wondered? Why I Love Sakura Gel Pens!

Good morning…Martha Richardson here. Isn't the Nov. Kit incredible with so many great products to try along with the Art Journal Coloring Pages designed by Catherine Scanlon. When thinking about which product I would highlight this month I decided it had to be the Sakura Gel Pens included in the kit.

(1) Exclusive Catherine Scanlon Art Journaling Coloring Book, 4 pages
(1) Niji Pearlescent Watercolor Set
(1) Tim Holtz Distress Glitter, Mustard Seed
(1) Tim Holtz Distress Glitter, Fired Brick
(1) Sakura Glaze Pen, Turquoise
(1) Sakura Glaze Pen, Hunter Green
(1) Sakura Gelly Roll Pen, Gold
(1) Sakura Gelly Roll Pen, Silver
(1) Sakura Gelly Roll Pen, Copper
(1) 2 pack, Sakura Souffle Pens
(1) Lindy's Stamp Gang Embossing Powder, Sunrise Salmon
(1) .5 oz bottle of Glossy Accents

I've avoided Gel Pens because I was never satisfied by the way they worked but this summer I purchased several Sakura Gel Pens upon the recommendation of Catherine Scanlon. To say it's now a love affair is an understatement!!!

Let's take a look at these Gel Pens:
In 1984, Sakura  invented the first gel-based ink. Ice cream smooth® Gelly Roll® pens come in colorful varieties from medium and fine point classic gel ink to Metallic, sparkly Stardust®, fluorescent Moonlight®, and more. The history is quite interesting and you can read more here at the Sakura Website.

In the Nov. kit you received the green and turquoise Sakura Glaze 3-D Glossy Ink pen. A three-dimensional (3-D) ink leaves a distinct impression and once dry leaves a raised, line that you can feel. Great for handwritten lettering on DIY paper craft projects and non-porous surfaces such as plastics, coated papers, acetate, vellums and glass. Brings depth, texture and dimension to your project.When using remember to write slowly so the ink flows out thickly and make sure  to dry completely {about 10 minutes}. It is water resistant and dries to a glossy – glaze look. 

The Sakura Gelly Roll Metallic pens create a a reflective sheen with archival quality ink that is chemically stable, waterproof, and fade resistant. Great for use on both light and dark papers. A 3-pack of gold, silver and copper will be great for any project that you want to add a little pizzaz to!

The Sakura Souffle Pen 3-D Opaque Ink is another 3-D pen and is used in the same manner as the Glaze 3-D. The difference is in the finish that it creates is a matte, opaque color. There are several colors but you will received white which will add a great look for any craft project.

There are several other Gelly Roll pens available from Sakura and I highly recommended all of them! Here is a list of the other pens and links to them. Sakura's website is filled with wonderful information including tips, videos and project ideas. Here are links to all the various types of Gelly Pens.

Gelly Roll® Classic™ Fine & Medium Point

Gelly Roll Moonlight®

Gelly Roll® Metallic™

Gelly Roll Gold Shadow™

Gelly Roll Silver Shadow®

If you like these pens then I suggest you take a look at this Gelly Roll® 64 Pen Set…with the holidays rapidly approaching it would make a great gift.

The biggest question is how to use the Gelly Pens as they are quite different from a ballpoint pen. Here is the #1 tip:

#1. Use gel pens gently. A gel pen has an internal mechanism that works differently from a ballpoint pen. 

Make circular motions on paper with your gel pen. The motion makes the tip (ball) roll and causes the gel ink to be pulled into the ball tip chamber. Avoid hitting either end on a hard surface to keep from jamming a gel pen.

Keep the caps on gel pens to keep them from going dry. The gel ink in gel pens cause them to dry up much faster than the ink in a ballpoint pen. The cap must be closed completely so that a seal is formed in order to keep the gel liquid.

Roll the tip of a gel pen in a circle slowly in order to get the ink flowing again if a pen stops working. The movement can get the gel flowing over the roller again.

Write on matte surfaces for the best result. Gel pens don't write as well on glossy or greasy surfaces.

Let's take a look at the Art Journal pages I created for todays tutorial using the Sakura Gelly Pens with the Art Journal Coloring Pages. I used an assortment of different Gelly Roll PensMetallic, Souffle, Stardust. I also used the Niji Pearlescent Watercolor set {which is FABULOUS and would require it's own separate blog post!}.


I had so much fun sitting and coloring I had to add one more project, this time using one of Catherine Scanlon Designs Nature Grid Stamp found in the FDS store.

For this project I used only the pens included in the kit. 
I love the look and even though it's not evident 
I used the white Souffle pens also.

I so appreciate you stopping by and spending time with me. I can't tell you how much I loved working with this kit. Now make sure you stop by daily and see what the other design team members have created. I have one more project coming up so make sure you look out for that.

Have a creative day!