Showing posts with label heather Kindt. Show all posts

Thursday, May 15, 2014

Art for a Journal

I'm thrilled to have this opportunity to talk shop (as they say) with you today. What great supplies we have to use from our kits (Tina has the best style)!!!

 Here is my true art love, a journal. Create without stress because you can keep it the way it is or come back to it forever.  Doesn't need to look good on the wall or become a gift for your mother-in-law. Just relax and create. 


 I have a journal that I've finished covering all the backgrounds with ink, paint and some texture using stencils. I chose a page that would really make the teal paint pop. 


Teal is opposite of magenta in terms of the color wheel, so it gives a great contrast. The teal paper strips are just the vellum pages painted with teal and a bit of the pumpkin to add depth. 


Once I chose my pages, I stamped some great texture with Natalie's stamps from the kit. 


 I love the giant circles because they really support focal points. 
 Just like my last post, I  used paper from Graphic 45's Coture collection. I liked repeated the girl image like she was in bubbles. I used the inks around the edges of the circles. 

 
  With the paper strips I made, I use a border cut out of patterned paper. 
 For really great layers, continue what patterns you started in the background in small amounts overlapping the new layers and the background. This convinces the eye that everything in unified. 


 It is also a good idea to put some of your new layer's color into the background. 

 Notice that I got a great effect from stamping with teal paint for a while then inking the dirty stamp and pressing hard! It was planned (nope I'm lying). 


 Make a cluster of collage to support the visual "weight" of your focal point. 
 The kit's embellishments are wonderful because they can be painted to go with almost any theme. 


 This is how I made my pages, and I hope it sparks some ideas for you! And notice, being different  is an ecellent idea. 


Art is like magic except the tricks are open to everyone. I welcome questions! 
-heather kindt


Sunday, May 11, 2014

Kick Back to Elementary School

by Heather Kindt

This month, I used the kit to create an 8x10 canvas. 

With the colors in the May kit led me to add the Graphic 45 Couture collection. 


I used the green spray and beach hut paint to cover a page of vellum. Then I stamped on the page and adhered it to a canvas. 


With the oil pastels, I covered the whole surface with black. Then just like in elenentary school, I gently made scratches to reveal the color underneath. The effect is still cool! 


Then I finished the collage with some of the bright papers and a mirror image of the fancy lady. 


Thursday, April 17, 2014

Bonus Collage

 This month I rounded up some of my leftover supplies from Frog Dog Studios kits and made a 12"x16" collage. 
 I'm not sure what I will do with it next. I might cut it down to smaller pieces. 


I did make a focal point, but I think it would do better with a quiet surrounding near by. 


Be kind to your dreams! So sweet! 

 Using the Alumilite metal powder and water makes that liquid metal. So amazing! 
 Also look for:
 Cardboard
 Tissue Papers 
 Gold pigment ink
 Mica fragments
 
Also used: Golden paint, Krink paint pen, stamp and leftover transparency embellishments. 

  Tina is really good at picking out awesome supplies for the kits each month! Hope you keep your leftovers too.- heather


Monday, April 14, 2014

Resin Resource


 This month there has been a lot of resin going on! And we are not the only ones, resin is trending all over the craft world. 

 What is resin anyway? Basically, it's a plastic. It's a special plastic that is very hard and clear when it has cured. Resin is fun because it becomes very glass-like.   More specific abilities of resin depends on the brand you are using. If you have tried it in the past and been frustrated, it's worth going back to. 

 Diamond Glaze, Glossy Accents, and a few others have some great shiny effects for paper crafting. They are ready straight out of the bottle and air dry. So why use a two part product that requires mixing and curing time? Resin has the ability to cover a large surface very quickly and much more economically. I have never seen Tim Holtz (who one cannot help but adore) filling up his shadow boxes with glossy accents. 
This was from my most recent post, but I did not bring this up to imply anything against Tim. I bring it up because I did try to coat a tray with Glossy Accents. Actually two trays, for two beloved family members. The compartments turned uneven and warped. I can hardly stand to look at it now, it's such a mess.

 At the time of my tray disaster, I did not know about self-leveling, doaming, or the role of surface tension. The paper crafting products I used had high surface tension (the characteristic that causes water to form in droplets) and so did not even out (or level). Resin will level out as far as it can when you have first mixed it before curing starts. This is why you can easily get a smooth glassy surface in those jewelry settings (usually bezels). 

 The other resin ability is that we can cast with it! Casting is pouring a material into a open form that will later solidify. I worked in a jewelry store's customer service area after college, and in the shop the jewelers would cast in gold and white gold every week. At the shop you see "Clear Cast" which is the clear resin. Amazing Crafting Products also makes a white casting resin. Have you see Prima or Melissa Francis's frames, butterflies, and other white embellishments? They are resin, probably a white resin. 

 There is one other piece you need to start casting, a mold. Amazing Crafting Products makes two types of mold making ingredients, molding putty and rubber molds. The putty is very easy, clean and quick. Mix it together and use a small object to create an imprint, and when it is no longer squishy, you have a mold. The rubber mold needs a container you can pour it into to set. However the cured mold is really flexible and surprised me with its ability to mold intricate forms. Don't forget there are finished molds you can pick up in your craft store if you would like. 

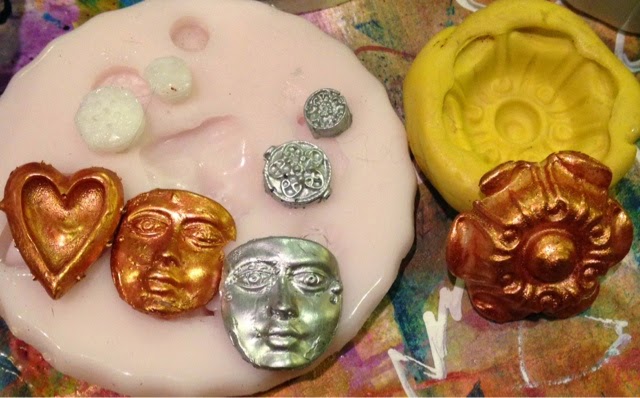
 I cast with a rubber mold, a putty mold and a polymer clay texture sheet for my recent project. Pictures, fianlly!

Rubber and putty molds, all objects are the cast pieces not originals. 

Martha Stewart mold with some Pearl powder from ACP dusted on before the pour.

A mold set by Mod Podge that I dusted with metallic powder

A texture mat by Lisa Pavelka for her favorite medium, polymer clay. Even these thin little gears held up. 

Here are some casts and the originals

 The casts come out clear or white, depending on what you use. I painted mine with Viva's Precious Metals Effects paint because it is fast drying. I'm confident Pinata paint or alcohol inkers will also work. This mostly applies to castings in the rubber mold because it creates a smooth surface that may not be good for water color and some acrylics paints. 

 Now see the cast pieces in my project close-ups. 


 If you have had the patience to read this whole post, then I think you will be better prepared of what you can expect from resin! One final and really important tip: read the instructions! Prepare the things you are working on and pay attention to stirring time, the time you have before it starts hardening and how long to leave alone to do its thing. 

 And it's only half way through the month! Enjoy resin! -heather

Monday, April 7, 2014

Steampunk Shadow Box Art


  It's another Steampunk inspired project from me (Heather Kindt). I don't always go Steampunk, and this project can certainly be in any theme! 
 I have "One More Thing" to add to the kit, which is going to be my reoccurring theme with Frog Dog's awesome kits. Last month, a paint color tied things together and this time it is the substrate when all the kit parts can be together. 


 You can use what ever kind you like. Since this one has a cover, I cut up my tissue and covered it. 


 With the Gold pigment ink, I painted what would be pages if it were an actual book (it is the blue Staz-On ink on the cover edges). I like this disguise!


 What is also difficult to show in the pictures, is the coating of resin I gave to the cover. But the cover was shingling and there is more resin to come.


 Before we get into it I want to show the technique I used for the stamping. I stamped all my images on deli paper. I used the colors and black so I would have choices. 


 You could also stamp on gift tissue paper. I prepped all my images and surfaces then prepared some resin. I recommend covering your large flat surfaces first if you have any. That way if gets a bit thicker it is just fine for enclosed areas like the boxes or jewelry bezels. 


 Here is everything drying! The resin is soaked into the paper and makes it more transparent. That is how my stamps became darker in the inked area and the images became sharper. You can sprinkle your mica flakes onto the wet resin for shimmer that will never fall off. Putting it under resin is fine too. On one of the fragments I adhered the quote (glossy accents or diamond glaze) then resin, then mica fragments. 

Here is the final shadow box book! Many of the accent pieces were cast in resin and painted. But that is a discussion for another day! Enjoy the close ups! 


 I used Big Pitt Pens for some color, and Staz-on ink pads for the edges.
 
 Defy shadow boxes shadows by flipping over some of the boxes! My ladies and gents would be hard to see if they were inside the boxes.


 Hello birdie! He is black, resin and golden edged. The letter blocks I got at the Frog Dog Studio store also got some gold and black. 


 No need to hang the fragments inside the box (like I have labored over in the past), find some buttons, thick adhesive tape or scrape cardboard and you can secure the fragment at any depth you desire. 


 If you have a cute embellishment you want to use, but it seems to fade away too much in the back of a box, you a pen to increase the contrast. And note all my little gears, butterflies, the scrollwork and the face I cast in resin myself! 

 I hope you enjoyed the pictures and enjoy creating with your kit! -heather Kindt