Showing posts with label ACP. Show all posts

Monday, April 14, 2014

Resin Resource


 This month there has been a lot of resin going on! And we are not the only ones, resin is trending all over the craft world. 

 What is resin anyway? Basically, it's a plastic. It's a special plastic that is very hard and clear when it has cured. Resin is fun because it becomes very glass-like.   More specific abilities of resin depends on the brand you are using. If you have tried it in the past and been frustrated, it's worth going back to. 

 Diamond Glaze, Glossy Accents, and a few others have some great shiny effects for paper crafting. They are ready straight out of the bottle and air dry. So why use a two part product that requires mixing and curing time? Resin has the ability to cover a large surface very quickly and much more economically. I have never seen Tim Holtz (who one cannot help but adore) filling up his shadow boxes with glossy accents. 
This was from my most recent post, but I did not bring this up to imply anything against Tim. I bring it up because I did try to coat a tray with Glossy Accents. Actually two trays, for two beloved family members. The compartments turned uneven and warped. I can hardly stand to look at it now, it's such a mess.

 At the time of my tray disaster, I did not know about self-leveling, doaming, or the role of surface tension. The paper crafting products I used had high surface tension (the characteristic that causes water to form in droplets) and so did not even out (or level). Resin will level out as far as it can when you have first mixed it before curing starts. This is why you can easily get a smooth glassy surface in those jewelry settings (usually bezels). 

 The other resin ability is that we can cast with it! Casting is pouring a material into a open form that will later solidify. I worked in a jewelry store's customer service area after college, and in the shop the jewelers would cast in gold and white gold every week. At the shop you see "Clear Cast" which is the clear resin. Amazing Crafting Products also makes a white casting resin. Have you see Prima or Melissa Francis's frames, butterflies, and other white embellishments? They are resin, probably a white resin. 

 There is one other piece you need to start casting, a mold. Amazing Crafting Products makes two types of mold making ingredients, molding putty and rubber molds. The putty is very easy, clean and quick. Mix it together and use a small object to create an imprint, and when it is no longer squishy, you have a mold. The rubber mold needs a container you can pour it into to set. However the cured mold is really flexible and surprised me with its ability to mold intricate forms. Don't forget there are finished molds you can pick up in your craft store if you would like. 

 I cast with a rubber mold, a putty mold and a polymer clay texture sheet for my recent project. Pictures, fianlly!
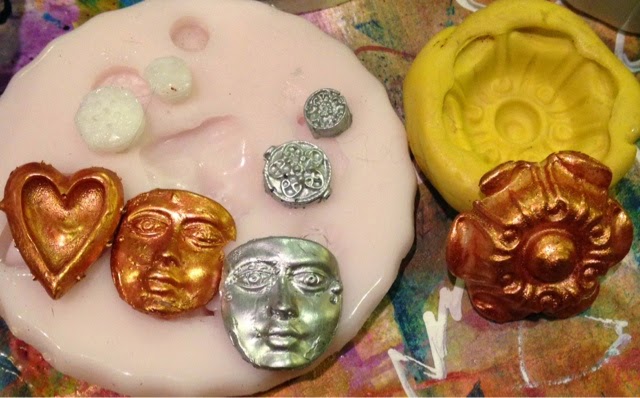
Rubber and putty molds, all objects are the cast pieces not originals. 

Martha Stewart mold with some Pearl powder from ACP dusted on before the pour.

A mold set by Mod Podge that I dusted with metallic powder

A texture mat by Lisa Pavelka for her favorite medium, polymer clay. Even these thin little gears held up. 

Here are some casts and the originals

 The casts come out clear or white, depending on what you use. I painted mine with Viva's Precious Metals Effects paint because it is fast drying. I'm confident Pinata paint or alcohol inkers will also work. This mostly applies to castings in the rubber mold because it creates a smooth surface that may not be good for water color and some acrylics paints. 

 Now see the cast pieces in my project close-ups. 


 If you have had the patience to read this whole post, then I think you will be better prepared of what you can expect from resin! One final and really important tip: read the instructions! Prepare the things you are working on and pay attention to stirring time, the time you have before it starts hardening and how long to leave alone to do its thing. 

 And it's only half way through the month! Enjoy resin! -heather

Tuesday, December 17, 2013

Frog Dog Studio Teams with Amazing Crafting Products : Vintage Styled Ornament :

A Beautiful Partnership has been formed...

Frog Dog Studio + Amazing Crafting Products

Together, we will be sharing even more creative projects than ever!
Our goal is to inspire you to create with us...as we all have FUN "in the making!"

Each of us on the Frog Dog Design Team have been experimenting and creating with 
Amazing Crafting Products, incorporating them into our December Kit projects.

This is my first joint project.


I knew I wanted to make an ornament, so I started with a simple metal frame ornament and a jewelry embellishment I found at Michaels.

These would be my mold pieces.
Once I create a mold, I can make as many frames as I want!


Amazing Mold Putty is simple to use.  Mix equal parts of each container.

IMPORTANT TIP: you must work quickly.  Have the piece you want to mold ready because you will have 2 minutes to work with the putty before it sets.

1 minute to mix with your hands (until 1 uniform color is achieved) and 1 minute to mold your piece.

I am beginning to understand why these products are called AMAZING:)


Above are my finished molds.  This was my first attempt and I am passing along my "learning curve!"

*Tip #1: Make sure your putty is smooth, without any dents or imperfections.  
(imperfections will carry over in all your cast pieces)

*Tip #2:  Uniform thickness is important so that you have a level piece when finished.
(if you look at my frame mold above right, you can see the top of the frame is thicker than the bottom.)

*Tip #3: Delicate pieces are more challenging to mold. The "spokes" on my jewelry piece are very thin and it is challenging to pour casting resin in such a small space...definitely a more fragile finished piece.


For this project, you could use either the Casting Resin or the Clear Cast Resin.
The Casting Resin dries white. The Clear Cast Resin dries clear.

I knew I wanted a metallic finish, so I decided to try mixing the Alumilite Silver Metallic Powder with the Clear Cast Resin to cast my molds.

1.) Mix equal parts of the A & B Clear Cast Resin solutions. (Use the plastic portions to measure, then combine both to mix into a plastic or paper cup.  (It really is easier to use a paper "dixie cup" because it is flexible enough to form a spout by squeezing the sides of the cup. This gives you more control when pouring.)

2.) Allow air bubbles to come to the top, and then stir slowly until you do not see any more swirls.

3.) Add a small amount of silver powder. (I used a popsicle stick to "grab" the powder and used 2 "scoops." (about a 1/2 teaspoon)


You can see below how thin the spokes are.  I tipped the mold back and forth to allow the resin to "move" down the spoke.


Above you can see the resin after it was poured.  I did have 2 of the spokes break.  After examining, I could see that I had not poured enough resin in those spokes...next time I will be more successful by using a small needle or toothpick to "push" more resin into the thin areas.

Below is the un-molded frame.  You can see a few imperfections in the center of the frame.
Glad I will be covering it up with a picture:)


*TIP: as soon as you remove cast pieces from your mold, see if you have any "heavy" areas that need to be trimmed.  If you look at the photo above, the "hanger" was a little chunky, but I easily trimmed it with scissors.

Next for the subject of the frame...This beautiful vintage image is from our December Kit.


I used a small make-up sponge with a little StazOn ink in brown to age the edges.
Next, I mixed Embossing Paste and Modeling Cream (1:2) to add 
to the fur trim on hat, coat and muff.
The Embossing Paste was in our October Kit and I still have plenty!


You can use the Modeling Cream alone.  It does give a 3 dimensional finish with a beautiful luster!
-Adding the embossing paste gave the Modeling Cream just a little more "stiffness."

I used a little more of the brown StazOn ink on these areas to give them added depth.


I decided to add glitter, to give the ornament even more of a vintage finish.

*Note: if you add this step, you could use EITHER the Amazing Casting Resin (dries white) or the Amazing Clear Cast Resin, since you'll be covering the piece with glitter.


1.) I mixed the 3 glitters together (they were 3 for $9 at Michaels)
2.) Coated the frame with Mod Podge
3.) Poured on the glitter and tapped off the excess

I did this same process with the jewelry piece below. (using silver glitter only)


I decided to break off half of the spokes on my jewelry piece. (2 were already broken)
  On each spoke end, and in the center, I added small crystal adhesive embellishments.

* The "STAR" piece you see on the bottom right of the frame is a  "snowflake" that was attached by a jump ring on the original ornament frame I purchased at Michaels.
(You can see the mold of this piece near the beginning of this tutorial)

Once the glitter was added ( I used silver glitter only to contrast with the frame), 
it looked more like a star...which I liked:)
I added another small crystal embellishment to it's center.


We are all excited about incorporating Amazing Crafting Products (ACP) into our monthly project tutorials.  Stay tuned for more great project ideas from our talented Design Team!

It is a joy to share and create with you!

Sue


Sunday, December 8, 2013

iphone case meets AMAZING CLEAR CAST RESIN & VIVA DECOR PAPER PEN


Our new partners "in crafts" (Amazing Crafting Products-ACP) 
have opened the door WIDE to many new and exciting projects 
utilizing both ACP products and the great supplies found at 
Frog Dog Studios.com including our monthly kits.


I have altered my iphone case several times...I'm sure this won't be the last...it's a problem I have:)


Above is what lies beneath:) 

This time, using both the Amazing Clear Cast Resin and the Viva Decor Paper Pen 
I created this Vintage Button Case.

(The Viva D. Paper Pen is a wonderful product I received in a previous Frog Dog Kit)

*NOTE: I am not using Frog Dog's December Kit for this project

First, I covered the case with some torn art paper...you could use any paper that would be a soft neutral background for your buttons to "shine."


I glued all the pieces on with Mod Podge.


Next, I pulled out a jar of my favorite vintage buttons. (I collect them)
I placed the buttons on top of the case, arranging & re-arranging them to get a good fit...
leaving about 1/4" border for the Paper Pen.

Once I was happy with the button placement, I glued them in place with Mod Podge, using a brush. I did this to keep them secure until they were coated with Resin.


Above you can see the application of the Opal Paper Pen border.  


It dries within 20-30 minutes... enough to layer the "piping" in order to build up a high enough "wall" to contain the poured Resin.

Along with the border, I piped around the "apple hole"  

I applied 3 "layers" of piping.


Before I poured the Resin, I added a heart cut out of a burlap ribbon with a thin Paper Pen border.  I wrote the words "-Love more" on a piece of the white art paper and glued both the words and another tiny button on top of the heart with Mod Podge.


Once the final layer of Paper Pen Piping was dry; and the heart, words, and button were in place, it was time to mix up the Amazing Clear Cast Resin.


It's SOOO easy...
1.) pour together equal parts of A & B.  
2.) let the air bubbles rise to the top 
3.) slowly stir until "swirls" disappear
4.) then pour!

I used about 1 Tbs. each, of both A & B


(it helps to "pinch" the cup together slightly to create a "spout" when pouring)


I used a popsicle stick (included in the Resin kit) to move the Resin over some of the buttons and the burlap heart, being careful to go slow, remembering not to pour too much at once, 
causing it to spill over my Paper Pen wall. 

*Make sure that your popsicle stick is completely clean, so that no unwanted debris gets trapped in your Resin.


  It is dry within 24-48 hours.  
(I used my phone the next day)


The small button in the top left hand corner is a little too close to the camera.  

MAKE SURE YOU KEEP THE BUTTONS FURTHER AWAY 
FROM THE CAMERA'S VIEW FINDER, SO THEY DON'T OBSTRUCT YOUR PHOTOS!
(or just omit those)

*I took that one button off and moved it slightly & re-attached it with a strong glue.
The top left corner was the only area that the Resin was not added.

I have a strong suspicion that I will be making another Resin Case soon!!!

I love how it turned out
&
It's very durable! Who needs an Otter?

It was especially adored by my 6th grade girls small group at church:)

The embellishments you could add with Amazing Clear Cast Resin are endless!

charms, beads, fabric scraps, movie tickets, stamps, coins, ribbon...

Hope this gives you some ideas for creating your own phone case with 
Amazing Clear Cast Resin and the Viva Decor Paper Pen!

It's a joy to create and share with you!
sue