Showing posts with label Halloween. Show all posts
Thursday, October 24, 2013
Playful Musings: Halloween Design Fun
Understanding basic design terms and element theory, helps one layout their design and how to use color.
You can stamp into Embossing Paste! Let set up about 10-15 minutes (test your area, humidity or dryness of weather can affect drying times! Experiment to see how long it takes.). You don't want the paste all the way dry but you don't want it wet. A stamp can be impressed into the paste and leave an impression without the paste leaving residue on the stamp.
I not only sprayed the film viewer piece, but used the stem from the sprayer to add splats of paint. This is from Lindsey's Stamp Gang and is a part of your KIT!!!
The moldable film was used with a die cut machine to cut out the bat. If you wanted to curl the wings, zap it with a stamping heat tool and bend up or down the wing edges.
Design Terms
When designing a layout, I have a basic idea but as I work, things change according to how I want to add colors or following basic ideals of design elements.
Here is my basic layout. You can see while it is nice, it is lacking something or looks unfinished.
Adding Contrast to layout
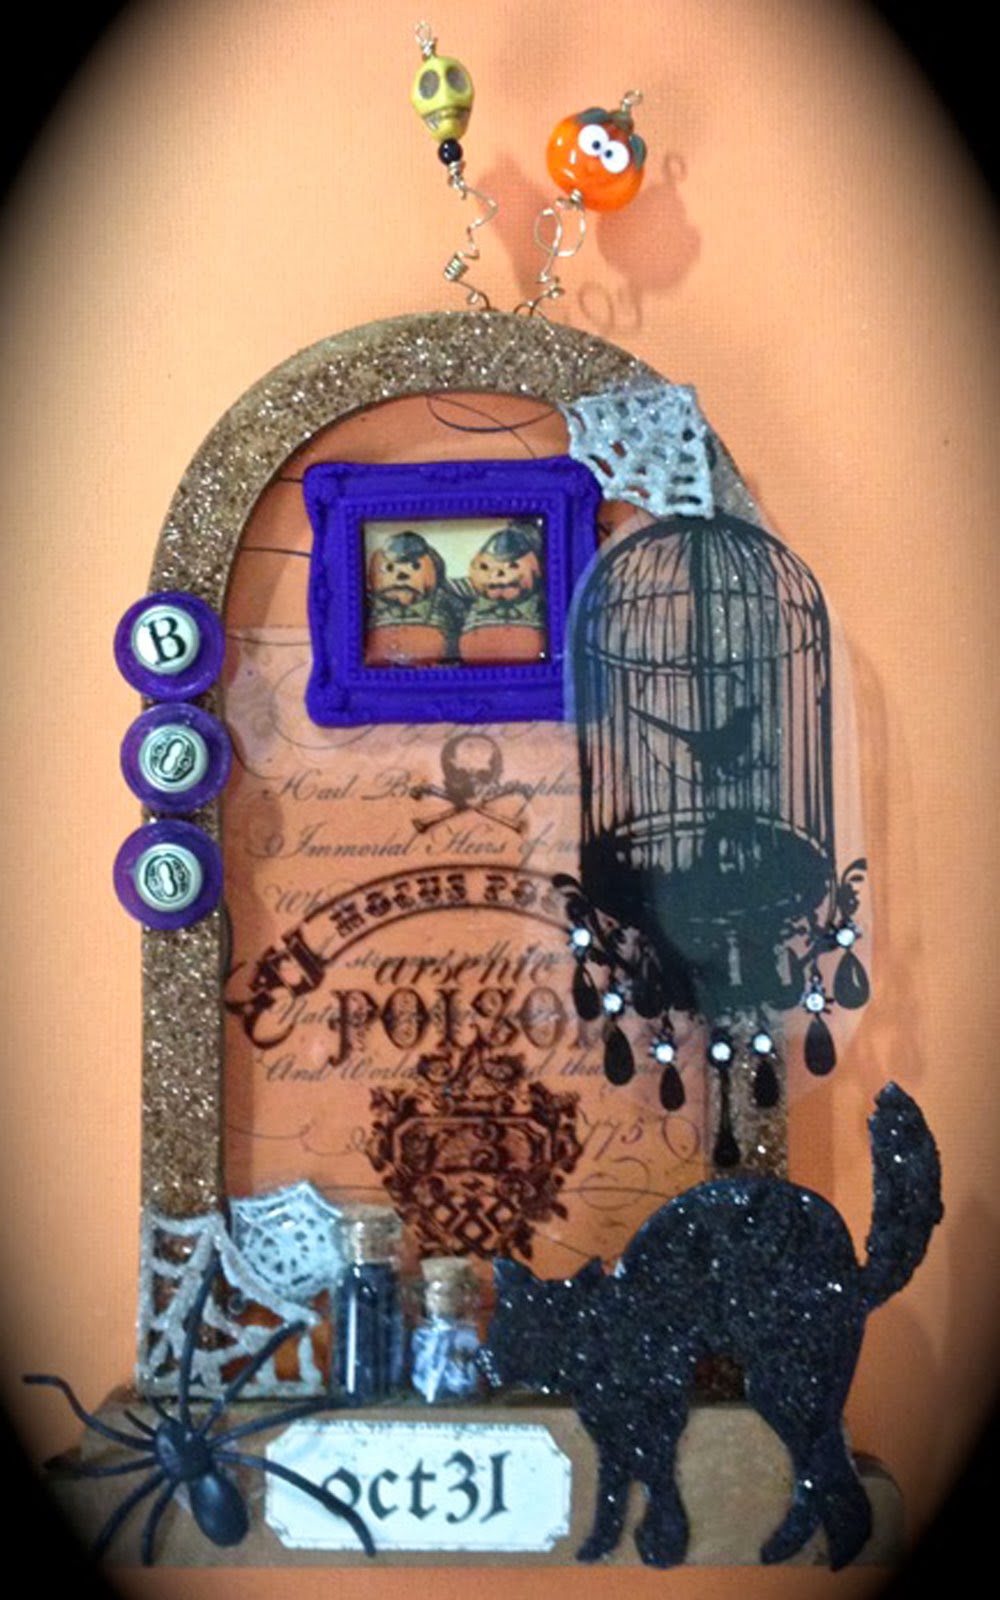
Adding splats of green color to film viewer, suddenly adds contrast and dimension to the area. The viewer no longer looks flat.
The Embossing Paste adds contrast with texture, also adding texture.
Adding dimensional items to flat, also adds contrast.
Bright yellow web adds contrast next to a more muted color.
Repetition
Repetition of colors or textures, elements, adds interest to the piece. Mostly they say as rule of thumb is "odds" is more pleasing to the eye. Different elements placed to create an odd number can work, or an even number such as 2 can work if there is contrast in size or color so elements do not get lost in the art.
Creating a number of 5, and drawing the eye around the layout is the bat, witch sign, cardstock web, little boy, and pumpkin. While the boy is the focal point, you want other elements to carry your eye around the layout. The film view is actually 1 which is odd (try not to have too many 1 element unless it adds texture or contrast) but it also makes 3 with the silver web charm and the bottle hanging down.
As far as colors go...The Gelli printed background (See September LTD Kit), has yellow, orange and green. Different shades of orange was used for repetition, purple was added a couple places as repetition and contrast, and the green.
Bridging
Bridging connects elements of the layout together. This way there is balance and elements are not just floating. If there are 2 elements together, a 3rd (the bridge) can tie them together.
The boy collage piece is a bridge for the Gelli print and the Embossing Paste texture. The chipboard web further bridges the collage element to the Gelli print. The collage image bridges the film viewer. The witch sign and bat is also a bridge.
Here is the October kit packed with so many goodies to play with. So many, you can do several mixed media art pieces! Check my October 9th post to see how I used the art parts, stencil, along with the the embossing paste, and embossing powder!!!
Knowing and understanding basic design terms can change the way you create your art. You no longer have a lost feeling - what goes where?? What colors do I use??? Why does my art look off-balanced?
To read about more design terms and about color theory, check out my book, Creative Art Concepts for Papercrafts, published by C&T Publishing (Amazon and other sources too.).
After some creating and practicing, the ideals of design will come second nature to you! The ideals/terms come in handy as a reference when you are stumped or struggling with what you want to create.
Frog Dog Studio Kits take the worry out of creating because all the products inside are matched to go together or for the individualist, can be used separately. Remember, a kit from the month(s) before can be used in a current kit :-D I love that! Because of the orange and fluorescent colors, I was able to use ink, and other items from the regular September kit.
Cre8tively Yours - Lea
Labels:
Design Terms,
Distressed ink,
Embossing Paste,
Halloween,
layout,
October Kit,
parts of September Kit
Wednesday, October 23, 2013
October Expanding Your Options - Keri
Hi there, and welcome again to my Expanding Your Options series!
This month, I created a Poe-themed Halloween decor piece, layering art mediums & accents from each current & past Frog Dog kit. The new products types in the mix this month are the embossing paste, embossing powder, and spray ink from October's kit.
Enjoy the video, and here's wishing you a crafty and fun-filled October, while it lasts!
Monday, October 21, 2013
Halloween Artful Shrine
Hello...Martha Richardson back again with a quick Halloween Artful Shrine to
share using the perfect embellishments from the FDS Oct. Kit.
I love making mini shrines for different holidays,
they are fast and also stash busters!
I first applied glitter to the various black cat, spider webs and shrine. I did a little wire-wrapping with the beads. Once everything was dry the fun part started...arranging all my tid-bits into a pleasing arrangement. I originally wanted to use both of the picture frames for this project however when I went to assemble it it was just TOO much.
Besides using the kit embellishments I also used buttons, alphabet bards, chipboard, glitter, transparencies, lampwork bead, plastic spider and paper from my stash...yay!
I had so much fun working with this months products. I got to use products that I've never tried before. The concept of a mixed-media kit is a fabulous way to try out new products and the kits from Frog Dog Studio allow one to do that! I would love to know what you've created from this months kit.
ENABLER ALERT: YOU will want the Nov. Kit!!
Thank you for stopping by and make sure you stop by to see the rest of the projects from the Design Team. Hope you have a creative week.
Sunday, October 20, 2013
October Gelli Plate : Trick or Treat Bag
Splat the Cat
Trick or Treat Bag
Created with
the Gelli Plate
There are so many creative ways to "Gelli"
Just looking around here at Frog Dog, you'll find many great ideas
posted by the gifted Design Team:)
I've been inspired by all of them!
This month, our Gelli project features a Hand Painted Trick or Treat Bag
using of course, the Gelli Plate
I started with this basic pattern, found at Etsy here.
Using an inexpensive muslin, I began by creating a background for the outside of the bag.
I recently purchased this cute green micro dot print, and this gave me direction for choosing the color palate.
(it will be the lining of the bag)
I decided on these colors, and mixed each paint (2:1) with a Textile Medium that would then allow the painted fabric to be soft and permanent when laundered.
Acrylic Paints Used:
Folk Art Clover
Americana Desert Turquoise
Plaid Pumpkin Orange
Textile Medium/Delta Ceramcoat
The second inspiration for this project came from my 2 1/2 year old Granddaughter Annabelle.
(who will be an Owl this year...her Mom made the costume...it is ADORABLE!! I think she found it on Pinterest...)
Annabelle LOVES Splat the Cat...and this bag will be hers:)
If you haven't seen one of "Splat's" videos or read any of his books, check out this cute video introduction.
(Splat is British-He calls His Mom, MUM)
The First layer of color used on the muslin was Blue.
(I am SOO sorry...I somehow neglected to take pictures of the blue, but if you look below, the same process was used for the Green)
I "loaded up" the Gelli Plate with the paint, spreading it on with a brayer. I then placed a 12 x 12 Diamond Stencil on top of the Gelli Plate, rolling over it a few times with the brayer. I lifted up the stencil, and then pressed the
cut muslin onto the Plate.
I did this process several times, moving the fabric each time at different angles, in order to fully cover.
(The fabric piece is larger than the Gelli Plate -13 x 15)
The Second layer of color I added was green.
Using the same process...
1.) place several "dots" of paint on Gelli Plate & spread by
rolling w/brayer
2.) lay down stencil (in this case the "dots")
-press with hands or roll over it with brayer
3.) lift up the stencil
4.) press fabric (already "gellied" with blue diamonds) onto
prepared plate
I did this process for both the front & back pieces of the bag.
Repeat until you're happy with the "blend" of color.
If you want to paint a "subject" on top of the finished background and you are not super confident in your drawing ability, find an image online that you like, print it out, and then cut it out.
You can use that to "trace" in pencil (or if you're brave, an extra fine black permanent PITT pen), with a plan to "fill in" the details.
This is the image I used...SPLAT has a Halloween Book..."Scaredy-Cat Splat!"
You can see the detail of the "Gellied" Background in the photo above:)
I love how it looks with the micro dot fabric I used for the lining, handles, and bow.
Look above...I wanted to make sure you could see that my outline was far from "perfect". You can adjust your lines, because you will be covering them up with paint:)
I used a White Signo Uni-ball pen to add details, and to sketch the spider.
(I could not find any information on whether or not you can "heat set" the ink from these Signo pens to ensure a permanent application)
If you know you will want to launder the bag, make sure to use permanent pens or paints prepared for fabric with a textile medium.
I made sure I pressed every inch of painted fabric with an iron...hoping this would do the trick.
YOU MUST HEAT SET ALL PAINTED AREAS
(When heat setting with an iron: make sure you place another piece of fabric between the painted piece and the iron.)
To achieve Splat's "fluffy/scratchy" fur, I feathered the ink all the way around him with the Signo pen in black.
I used an XS Black Pitt Pen for the details along with an Orange Pitt Big Brush Pen for depth on the Pumpkin.
(both of these pens are permanent)
Above is a close-up of the "Gellied" background fabric.
I added orange dots, using the same orange paint previously mixed...applied by dipping the end of a pencil eraser in the paint & stamping onto fabric.
Again, the Pattern for this bag can be found at Etsy here.
Hope this inspires you to try NEW things with your Gelli's!!!
Thanks for stopping by!
It's a joy to share with you:)
sue
Friday, October 18, 2013
The Witching Hour--October Limited Edition Kit
Welcome, friends!! Today I have another spooky project for you using the October Limited Edition Kit. For this project I used the 5 x 7 canvas board, ephemera, Lindy's sprays and Magicals, and the Dylusions stamps. Let's get started!
To begin, I laid down a background of the Lindy's Magicals combined with the spray ink. I also worked in a bit of the Viva Decor Glitter paste because I just can't get enough of that stuff!


I wanted to create a quirky, funky little Halloween house so I de-constructed the viewfinder and it's envelope. I cut the envelope into a house shape, and the stamp sheet into a roof. I cut up the viewfinder and tried to use the little negatives as windows, but they wouldn't stick so I ended up using the frames they were housed in instead. I also cut the club off of the playing card and stuck it on top like a weather vane. Then, I used one of the Dylusions border stamps to create a little eave to attach under the roof. I also attached one of the bingo pieces on the front door.

At this point I thought the bingo piece didn't really fit in too much so I painted it with the Lindy's. I also added some rub ons and stamping to the piece, as well as an older Tim Holtz sticker that I had in my stash.
This piece sat for a couple of weeks like it is. I wasn't totally happy with it, but couldn't figure out what was wrong. I just knew that it felt "off" somehow. So I gave it some thought. In the meantime I added some white Magicals because I thought I would be adding something else to it and wanted to lighten up the background a little bit.
In the end I ended up removing the Spooky sticker and the bingo piece. I then downloaded some free vintage clip art and added that instead. I found the cute sentiment and added that as well. While browsing around at Hobby Lobby I found the perfect frame (which happened to be 50% off!) and once I made those changes I was a lot happier with the piece overall. I think that this is why I struggle with making videos. I change so many things around and go back and forth and let things sit for so long while I mull them over!


I'd love to hear your thoughts on what you do when you get stuck on a piece that doesn't feel right. Any suggestions on how you push through a creative block? Thanks for stopping by :)
To begin, I laid down a background of the Lindy's Magicals combined with the spray ink. I also worked in a bit of the Viva Decor Glitter paste because I just can't get enough of that stuff!
I wanted to create a quirky, funky little Halloween house so I de-constructed the viewfinder and it's envelope. I cut the envelope into a house shape, and the stamp sheet into a roof. I cut up the viewfinder and tried to use the little negatives as windows, but they wouldn't stick so I ended up using the frames they were housed in instead. I also cut the club off of the playing card and stuck it on top like a weather vane. Then, I used one of the Dylusions border stamps to create a little eave to attach under the roof. I also attached one of the bingo pieces on the front door.
At this point I thought the bingo piece didn't really fit in too much so I painted it with the Lindy's. I also added some rub ons and stamping to the piece, as well as an older Tim Holtz sticker that I had in my stash.
This piece sat for a couple of weeks like it is. I wasn't totally happy with it, but couldn't figure out what was wrong. I just knew that it felt "off" somehow. So I gave it some thought. In the meantime I added some white Magicals because I thought I would be adding something else to it and wanted to lighten up the background a little bit.
In the end I ended up removing the Spooky sticker and the bingo piece. I then downloaded some free vintage clip art and added that instead. I found the cute sentiment and added that as well. While browsing around at Hobby Lobby I found the perfect frame (which happened to be 50% off!) and once I made those changes I was a lot happier with the piece overall. I think that this is why I struggle with making videos. I change so many things around and go back and forth and let things sit for so long while I mull them over!
I'd love to hear your thoughts on what you do when you get stuck on a piece that doesn't feel right. Any suggestions on how you push through a creative block? Thanks for stopping by :)
Sunday, October 13, 2013
Vintage Drawer Project
I have thoroughly enjoyed our October Kit, and upon receiving it, I knew it was just what I needed to make the "vintage drawer scene" I have been waiting to create.
I marvel at the depth our monthly kits provide...Tina makes it easy to create...So many options!
I had taken the drawers out of this little antique in order to store my Copic Markers.
I knew I would use the drawers for something, so they have been patiently waiting:)
I began with the background that would be placed in the drawer "bottom"
seen behind the houses in the scene. These are old Bingo Cards.
Above is Lindy's Stamp Gang's Moon Shadow Ink in
Buccaneer Blue. I first covered the card with a very wet sponge brush, then spattered more with a liner brush.
(I used this color for several projects this month...love it)
TIP: When you paint one side of something it will begin to "buckle." Painting the other side
(with anything) will correct this.
"The scene" takes place at the home of these three lovely witch doctor sisters:)
I found the images here, cut out the size that fit my Art Parts house window, and covered it with Glossy Accents to seal, protect & add dimension.
I painted the houses with black gesso
(any paint would be fine, the gesso was just handy)
I took our Frog Dog Exclusive Stencil out to add texture to the houses using the Studio 480 Wendy Vecchi Embossing Paste....it goes on like "butter" I REALLY LOVE this product!!
(Having exposure to Frog Dog Studio has opened up my "tool box" to SOOOO many new products!!)
Next, I "inked up" the houses with and embossing pad, and added Lindy's Stamp Gang Embossing Powders in Midnight Gold & Blue.
Just sprinkle it over the wet embossing ink, tap off excess, then use a heat tool to activate the "magic."
LOVE how it looks:)
Just sprinkle it over the wet embossing ink, tap off excess, then use a heat tool to activate the "magic."
LOVE how it looks:)
*Note: I did add some white gesso later, to help the houses stand out a little more from the Background.
To my surprise, when adding Lindy's Stamp Gang Embossing Powder in Cosmic Pink over black, it turns a very delicious blue:)
I added just a few touches of the Moon Shadow Ink in Long John Silver.
To the house, I rubbed on the number 13 from a
Tim Holtz Transfer.
(Advantus Idea-Ology Remnant Rub On Numbers)
For the Fence, I happened to "spy" a piece of twine ribbon in my stash that reminded me of a fence. I didn't have any "STIFFY" (a product used to stiffen ribbon) but had some PVA.
(PVA-book binding glue)
So....I saturated the ribbon with glue, and then hung it outside to dry.
When the Twine Ribbon was dry, I used Tim Holtz Distress Ink in Walnut to give it some color.
For the "Graveyard" next to the "Dr.'s Office", I took these Art Part pieces and covered them with Lindy's Stamp Gang Moon Shadow Ink. (Long John Silver)
I used a stamp with "script" to add character to the Gravestones.
...using Brillance Ink...a favorite of mine for dark backgrounds.
For the "hill" I used florist foam.
cut with a serrated knife.
Next, I added craft glue and sprinkled REAL DIRT all over it.
(my husband began to question my mental state
at this point, haha)
Glue and Dirt were also added all over the entire "ground" of the scene.
Here you can see that I added some torn pages from a vintage book to the edges of the drawer using matte medium.
For the top of the drawer, I added the VIALS from our kit
(I happened to have the largest one in my "stash")
I printed off the labels, using the font
"SANDWICH PAPER."
I used a XS Pitt Pen to "box in" the words and then added a
little detail in each corner to give it a vintage look.
I added a chain to the "Spider Legs" Vial
(Tim Holtz, Idea-ology Swivel Clasp)
The Lizard Tongue is cut up pieces of the "left over" stiffened twine ribbon fence:)
ABOVE, housing the "Witch Doctors" sign, is and old fishing license tag. I think this is one of my favorite elements of the drawer. I have been waiting for years to use it on "just the right project!"
I had this old "Salve" container and joining it in this grouping, are a few odds and ends I had
in my never ending stash:)
The last 4 additions to the drawer were the Vintage keys, (hanging on a small nail) the "Creepy" banner, the cute Wooden Spider Web, and the Cat Image.
(last 2 from our October kit!)
Ps. I covered the Cat Image with Glossy Accents to give it some "Body" to stand.
I hope you are inspired to create something
"out of /In the box"
with our FABULOUS OCTOBER KIT!
As always, it is a joy to share with you,
Sue
\
Subscribe to:
Comments (Atom)


