Showing posts with label Steampunk. Show all posts

Saturday, April 12, 2014

Every Girl has her FROG PRINCE...


Hello creatives! Susan here dropping in with a special project from the Amazing Crafting Products Creative Team today combining items from previous Frog Dog Studio Kits and Amazing Crafting Products – our Partners "In-Crafting". I live in South Florida which is summertime 80% of the year. We had a 48 hour cold spell back before the holidays and when life brings you "creative gifts" you have to run with them. I set off on a journey of creating a custom art doll... but he's more like a FROG PRINCE to me.

To keep this tutorial to a reasonable length, I'm leaving out the molding process. I invite you to please, save the date and visit the Amazing Crafting Products Blog for Mold Rubber Monday on April 14th to see how I created this mold {CLICK HERE to view}.


Supplies Used:
From the December 2013 Mixed Media Kit: Tim Holtz Eclectic Elements - 6" Fabric Crafting Pack; Luminarte Acrylic Silks in Carmen and Fern; Prima Vintage Vanity 2" Stamp "Checkered"; Tim Holtz Ideaology Tinsel Twine; and Duro 6"x6" Stick-On Canvas Pack

Other Supplies Used:
Amazing Mold Putty; Amazing Mold Rubber; Amazing Casting Resin; Alumilite Fluorescent "FLO" Green Dye; Alumilite Pearlescent Metallic Powder; Scissors; paintbrush; mist bottle; sewing machine; Fiskars Pinking Shears; black fun fur; needle with thread; gears from stash; pipecleaners; seed beads and thin 24 gauge silver jewelry wire.


The fabric pad is a wonderful assortment of patterns – many of them perfect to dress my Frog Prince. I really love how the squares have a pinked edge to keep them from fraying.


I had another project I created using the December 2013 Mixed Media Kit and I had this mist leftover made from the Luminarte Acrylic Silks in Fern. CLICK HERE to view mists on my holiday tree in a bottle.


I poured the liquid onto the fabric and let it soak in to stain them to match.


Some I just splattered with the green to add to the distressing, while color coordinating


Details of my painted/splattered squares when dry... totally grungy!


Now I take my base frog cast in Amazing Casting Resin with a mixture of Alumilite Pearlescent Metallic Powder and Alumilite Fluorescent "FLO" Green Dye. Using a brush and my fingers, I apply and build up layers of the Luminarte Acrylic Silks in Fern, letting set, then rubbing some color away to bring out the details. Please visit the Amazing Crafting Products Blog for Mold Rubber Monday on April 14th to see how I created this mold/casting {CLICK HERE to view}.


I set the body and legs aside to dry. Now he is a bright spring green color and ready to be dressed. I think my prince needs a crown to adorn his head.


Using the Luminarte Acrylic Silks, I painted the sticky back canvas sheets with the Fern and stamped with the Prima Vintage Vanity "Checkered" stamp with the Carmen {red}.


I trimmed two sections to be about 2" high by about 4-5" long {I just sort of eyeballed it according to the cylindrical shape I liked}. I peeled off the backing halfway and adhering the tops of each together, then formed into a circular shape forming the crown – overlapping inside slightly and letting one section overlap the other to hold it's shape. For the edges not adhered: I folded up one edge and added fabric scraps to the exposed adhesive to add contrast and texture.


I finished off the crown by cutting triangular peaks and bending the tips outward. You can see the painted canvas inside and out. Those steps could have been skipped, but I am all about the little details - it's a personal preference of how detailed you want to make things. I still have one section of the adhesive edge remaining that I didn't fold over. I trimmed a little off and adhered tinsel twine around the base of my crown. No muss - no fuss. I added some faux painted gems with the red luminarte using the back of my paintbrush. A perfect crown for this prince!


I sort of winged-it when sewing the clothes. My apologies I don't have steps to share. I have been sewing since I was about age 10 so I just went for it since they are such basic shapes. I layered the pieces together and pinned in place to make larger sections. Then I free form cut out pants, a collar, a shirt and sleeve extensions using Fiskars pinking shears {this prevents material from fraying}. I pulled the threads on the collar to gather and added a black fun fur edging around the neck by hand. I hand stitched all the pieces together as I assembled the body to the legs. The size of the clothes are that of a small doll, so the sewing was quick and straighforward... nothing fancy. Since this frog is going to be grungy and steampunk, I let the sewing be tattered to add to his charm.


Before final assembly - I had a bit of work to do to add the digits back to his hands and feet which didn't come out in the molding process due to the thinness and airbubbles in the tiny areas. No worries! Using thin 24 gauge silver wire and seed beads, I fashioned digits and wire wrapped in place on the hands and feet. I really love how realistic they look and the contrast they give against the resin casting... plus now I can bend the wire to pose. I added some layered gears to the shirt front and more of the tinsel twine to tie in with the crown. Now he's ready for his new digs!


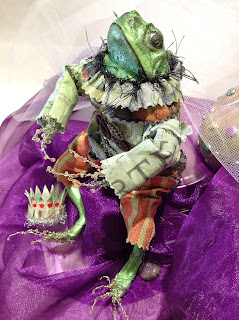
A Frog Prince with a Steampunk Twist!


I have to thank Tina for her amazing selections in this Frog Dog Studio Kit. The supplies totally inspired this creation! I encourage you to listen to your muse... and play!

Thanks for dropping by and checking out my project today!
You can find more of my work at the Amazing Crafting Products Blog
~ Susan M. Brown {sbartist}

Monday, April 7, 2014

Steampunk Shadow Box Art


  It's another Steampunk inspired project from me (Heather Kindt). I don't always go Steampunk, and this project can certainly be in any theme! 
 I have "One More Thing" to add to the kit, which is going to be my reoccurring theme with Frog Dog's awesome kits. Last month, a paint color tied things together and this time it is the substrate when all the kit parts can be together. 


 You can use what ever kind you like. Since this one has a cover, I cut up my tissue and covered it. 


 With the Gold pigment ink, I painted what would be pages if it were an actual book (it is the blue Staz-On ink on the cover edges). I like this disguise!


 What is also difficult to show in the pictures, is the coating of resin I gave to the cover. But the cover was shingling and there is more resin to come.


 Before we get into it I want to show the technique I used for the stamping. I stamped all my images on deli paper. I used the colors and black so I would have choices. 


 You could also stamp on gift tissue paper. I prepped all my images and surfaces then prepared some resin. I recommend covering your large flat surfaces first if you have any. That way if gets a bit thicker it is just fine for enclosed areas like the boxes or jewelry bezels. 


 Here is everything drying! The resin is soaked into the paper and makes it more transparent. That is how my stamps became darker in the inked area and the images became sharper. You can sprinkle your mica flakes onto the wet resin for shimmer that will never fall off. Putting it under resin is fine too. On one of the fragments I adhered the quote (glossy accents or diamond glaze) then resin, then mica fragments. 

Here is the final shadow box book! Many of the accent pieces were cast in resin and painted. But that is a discussion for another day! Enjoy the close ups! 


 I used Big Pitt Pens for some color, and Staz-on ink pads for the edges.
 
 Defy shadow boxes shadows by flipping over some of the boxes! My ladies and gents would be hard to see if they were inside the boxes.


 Hello birdie! He is black, resin and golden edged. The letter blocks I got at the Frog Dog Studio store also got some gold and black. 


 No need to hang the fragments inside the box (like I have labored over in the past), find some buttons, thick adhesive tape or scrape cardboard and you can secure the fragment at any depth you desire. 


 If you have a cute embellishment you want to use, but it seems to fade away too much in the back of a box, you a pen to increase the contrast. And note all my little gears, butterflies, the scrollwork and the face I cast in resin myself! 

 I hope you enjoyed the pictures and enjoy creating with your kit! -heather Kindt 


Sunday, March 23, 2014

Mirror Covered Book Draft

Hi mixed media artists! Don't you love this kit? First I made a handout for you on making a cute little book. 

https://docs.google.com/drawings/d/13achSELQf9wJ9n61eYXN8Yt4x5dFL-YXss6DItTgGuM/edit?usp=docslist_api

For my cover I used the Foil tape from the kit. The spine is two sticky canvas pieces which I had leftover from an earlier kit. 

I stamped on the Foil tape using the pebble paint. After the paint dried I went back with a brush to clean up the stamping. 


To decorate the cover I used gears left from my previous project, the trinket boxes. The "spine" is painted black from using the Black alcohol ink from a previous kit. I love how glossy it is! Next you can see I continued using turquoise accent paint. Finally to secure the stamped image by giving it a coating of Diamond Glaze. This also protects the reflective attribute of the foil paper.


 For the inside I chose a scrapbooking paper that went well with the Pebble paint. Then I covered the paper and inside canvas piece with a layer of paint. Choose a ribbon that ties and unties easily. Glue in down in the middle so the paper can be placed on top.


  Consider using the paper for your art, etc. before gluing it down.


 I like a little bling and found a good spot on the cover. 


 I hope you like this little book project and wish you a Happy Spring! -heather 


Sunday, March 9, 2014

Steampunk Trinket Boxes

      Hello! Hello! I'm psyched to be here to craft! Let's dive in. You may have seen the sneak peek already, and we are going to start with the boxes.


      I have in mind to feature a reoccurring theme called, "Just One More Thing." Every month I'll add something to the kit. Maybe I'll have a cool found object or maybe I'll have a simple object that has a huge impact in my projects. 

      This month it is turquoise acrylic paint. When I saw metal, rust, metallic sprays, and gears, I was thrilled and knew I needed a turquoise/teal/mint green paint. 
      Rust and patina greens are literally made for each other. Think of the Statue of Liberty, she is copper on the outside! The turquoise looks great and provides a contrast to the rust so you can see the texture more easily. 
   TIP: I tested which color I should paint the gear 
before applying the rust and it made no difference. 


 Above: the gears turning rusty. 

Here is one with the paint.
TIP: Apply unevenly, build up paint in corners if possible.

           I also sprayed the gears with both of the Lindy's Stamp Gang Sprays to get some yellow metallic in the rust. 

TIP: make your spray spotty or splotchy
 by not pushing the spray button down fully.

       For the lid of the box, I tried out the black paint from the kit. I had never seen it before and now I love it! It dries quickly like an alcohol ink, but it looks like a glossy paint. 

      Check out the look when the lids were covered! 

                                                          
TIP: give them a little extra time for the paint to fully set,
 and if you scratch it, try covering the scratch with a Sharpie. 

      The bottom part of the boxes are painted turquoise. I then decorated with patterned  paper and a Steampunk babe I had been saving (from "Steampunk Spells"). On the smaller box I used hot air balloons with stacked gears. 


         The super sleek black made a huge contrast to the flat, colorful paper and the texturized gears. I was so happy with the final result! 


     Thanks for checking this out and soon I'll show you how to make a little book that will fit inside the large box. 
Enjoy! -heather 
(In the pretty green moss)