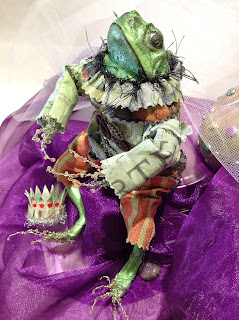
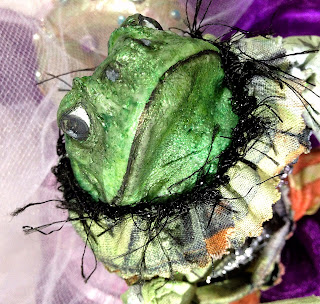
Hello creatives! Susan here dropping in with a special project from the Amazing Crafting Products Creative Team today combining items from previous Frog Dog Studio Kits and Amazing Crafting Products – our Partners "In-Crafting". I live in South Florida which is summertime 80% of the year. We had a 48 hour cold spell back before the holidays and when life brings you "creative gifts" you have to run with them. I set off on a journey of creating a custom art doll... but he's more like a FROG PRINCE to me.
To keep this tutorial to a reasonable length, I'm leaving out the molding process. I invite you to please, save the date and visit the Amazing Crafting Products Blog for Mold Rubber Monday on April 14th to see how I created this mold {CLICK HERE to view}.
Supplies Used:
From the December 2013 Mixed Media Kit: Tim
Holtz Eclectic Elements - 6" Fabric Crafting Pack; Luminarte Acrylic
Silks in Carmen and Fern; Prima Vintage Vanity 2" Stamp
"Checkered"; Tim Holtz Ideaology Tinsel Twine; and Duro 6"x6" Stick-On
Canvas Pack
Other Supplies Used:
Amazing
Mold Putty; Amazing Mold Rubber; Amazing Casting Resin; Alumilite
Fluorescent "FLO" Green Dye; Alumilite Pearlescent Metallic Powder;
Scissors; paintbrush; mist bottle; sewing machine; Fiskars Pinking Shears; black fun fur; needle with thread; gears from stash; pipecleaners; seed beads and thin 24 gauge silver jewelry
wire.


The
fabric pad is a wonderful assortment of patterns – many of them perfect
to dress my Frog Prince. I really love how the squares have a pinked
edge to keep them from fraying.

I
had another project I created using the December 2013 Mixed Media Kit and I had this
mist leftover made from the Luminarte Acrylic
Silks in Fern. CLICK HERE to view
mists on my holiday tree in a bottle.


I poured the liquid onto the fabric and let it soak in to stain them to match.


Some I just splattered with the green to add to the distressing, while color coordinating

Details of my painted/splattered squares when dry... totally grungy!
Now
I take my base frog cast in Amazing Casting Resin with a mixture of
Alumilite Pearlescent Metallic Powder and Alumilite Fluorescent "FLO"
Green Dye. Using a brush and my fingers, I apply and build up layers of
the Luminarte Acrylic
Silks in Fern, letting set, then rubbing some color away to
bring out the details. Please visit the Amazing Crafting Products Blog for Mold Rubber Monday on April 14th
to see how I created this mold/casting {CLICK HERE to view}.

I
set the body and legs aside to dry. Now he is a bright spring green
color and ready to be dressed. I think my prince needs a crown to adorn
his head.

Using the Luminarte Acrylic Silks, I painted the sticky back canvas sheets with the Fern and stamped with the Prima Vintage Vanity "Checkered" stamp with the Carmen {red}.

I trimmed two sections to be about 2" high by about 4-5" long {I just sort of eyeballed it according to the cylindrical shape I liked}. I peeled off the backing halfway and adhering the tops of each together, then formed into a circular shape forming the crown – overlapping inside slightly and letting one section overlap the other to hold it's shape. For the edges not adhered: I folded up one edge and added fabric scraps to the exposed adhesive to add contrast and texture.

I
finished off the crown by cutting triangular peaks and bending the tips
outward. You can see the painted canvas inside and out. Those steps
could have been skipped, but I am all about the little details - it's a
personal preference of how detailed you want to make things. I still
have one section of the adhesive edge remaining that I didn't fold over.
I trimmed a little off
and adhered tinsel twine around the base of my crown. No muss - no fuss.
I added some faux painted gems with the red luminarte using the back of
my paintbrush. A perfect crown for this prince!


I
sort of winged-it when sewing the clothes. My apologies I don't have steps
to share. I have been sewing since I was about age 10 so I just went for it since they are such basic shapes. I layered the
pieces together and pinned in place to make larger sections. Then I free
form cut out pants, a collar, a shirt and sleeve extensions using
Fiskars pinking shears {this prevents material from fraying}. I pulled
the threads on the collar to gather and added a black fun fur edging
around the neck by hand. I hand stitched all the pieces together as I
assembled the body to the legs. The size of the clothes are that of a
small doll, so the sewing was quick and straighforward... nothing fancy.
Since this frog is going to be grungy and steampunk, I let the sewing
be tattered to add to his charm.

Before
final assembly - I had a bit of work to do to add the digits back to
his hands and feet which didn't come out in the molding process due to
the thinness and airbubbles in the tiny areas. No worries! Using thin 24
gauge silver wire and seed beads, I fashioned digits and wire wrapped
in place on the hands and feet. I really love how realistic they look
and the contrast they give against the resin casting... plus now I can
bend the wire to pose. I added some layered gears to the shirt front and
more of the tinsel twine to tie in with the crown. Now he's ready for
his new digs!


A Frog Prince with a Steampunk Twist!

I
have to thank Tina for her amazing selections in this Frog Dog Studio
Kit. The supplies totally inspired this creation! I encourage you to
listen to your muse... and play!
Thanks for dropping by and checking out my project today!
You can find more of my work at the Amazing Crafting Products Blog
or at my personal blog... sbartist : painting in the dark.
~ Susan M. Brown {sbartist}


Wow, wow, wow! Just...wow!
ReplyDeleteThanks Sandra! I am so in love with this project :)
DeleteI'm speechless, I was wondering when and how he would make his appearance, this is AMAZING, WOW, I can't think of any other words to describe how this post just made me feel, amazing work Susan. gotta share this -
ReplyDeleteThanks Maria - He is so adorable. I think he might need a proper throne!
DeleteFANTASTIC!!!!
ReplyDeleteThank you Lyneen - I'm so glad you like him :)
DeleteSusan, this is utterly amazing! Your creativity knows no bounds :)
ReplyDeleteThank you for the best compliment ever Christi <3
DeleteBeautiful work Susan! I really love how he turned out! :D
ReplyDeleteThanks so much Tracy - we might have to collaborate on a story here.
DeleteSusan you are a creative genius!! This is just astounding you are so incredibly talented!
ReplyDeleteThank you Isie - I look forward to you meeting him in person very soon :)
DeleteThat is the most handsome frog prince I've ever seen! Excellent work!
ReplyDeleteThanks Brenda! This was a fun creative adventure :)
DeleteYou did great with this guy, Susan!! I really like him. :)
ReplyDelete