Showing posts with label Journal page. Show all posts

Wednesday, May 21, 2014

May Kit Journal Page with Gelli Plate prints and Stencil Girl:)

Hello again!! 

I'm loving our May kit so here I am up again with my next project...a spread in my 
Gratitude Journal.

I'm so grateful for good friends...friends that know all your flaws and love you just the same:)


For this project, I used 

Oil Pastels
Paper Artsy Fresco Finish Paint (beach hut) 
Stampendous, n*Studio Stamp Set 
Stencil Girl typewriter stencil 
Scarlet Lime pen 
Uni-ball Signo pen (white)
Pitt multi-liner pen (black, XS)
Gelli plate prints (from previous May project)
Super heavy gesso


So, I started by adding blocks of color with the oil pastels.


Next, I brushed on (with a foam brush) the Fresco Finish Paint
It's transparency allows the beautiful color beneath to come through.


I loved using the Fresco paints with my Gelli plate, so I made plenty of prints during my previous card and envelope project this month.  You can see how I created these here.

I tore them into pieces and applied them to the pages with matte medium.


Next, I used super heavy gesso to stencil this cute Stencil Girl typewriter. 


I added bits and pieces of detail with the my three favorite pens...
Uni-ball Signo (white) , Scarlet Lime, and Pitt multi-liner (XS)


It's all in the detail:)

(except for the pencil lines I forgot to erase!)


I used a Brilliance ink pad in moonlight white to apply the "chain link" stamp


Hope you feel inspired to journal with our great May Kit!!

As always,
It's a joy to share with you!

Sue


Tuesday, May 20, 2014

Elmer's Glue Resist with Oil Pastels


Hello!  

Happy Tuesday:)

I think I like the process for this project even more than the completed page...

I really enjoyed experimenting with ALL the products in our wonderfully made May Kit!


So, here it goes...

I grabbed a piece of black card stock to create this page.
Using clear Elmer's glue, I drew a design on the right and left sides. 
(You don't have to use clear...white glue dries clear as well- it's just what I had on hand.)


Next, I colored in the design with the Oil pastels.


I love how they look on the black background.

Next, I used the cute Prima Marketing Chalk Edger Ink (pastel green) & the Stencil that came with the Stampendous n*studio stamp set 

(on the black paper, the green looks almost white)


I wanted to tone down the stenciled "dots" above, so I stamped over it (in black) with one of the stamps from the Stampendous n*studio stamp set....see below.


I used another stamp in the set (I especially LOVE this one!) and applied the very cool Paper Artsy Fresco Finish Paint (pumpkin soup) with a Q-tip


For a little more "pop" to help my sentiments stand out...
a little Brilliance in moonlight white...
using a third stamp in the kit...what a great value to receive all 3 of these great stamps!!!


I added some detail with one of my favorite pens...Uni-ball Signo in white.


The Fireworks spray mist (new sprout) looks great on black too, so I "dripped on" some fun "splatters."


As always, so many of the kit products will last for a long time to come...

THANK YOU FROG DOG!!!

Hope you are inspired to create today!!! 

It's a joy to share with you,

Sue

Monday, March 10, 2014

Letter It! A monthly series...with a lot of help from Lindy's


Yay! for our Limited Edition Kit!
The "jewels" of the kit of course are the Lindy's Stamp Gang Starburst Sprays.

No other product gives you the intense color and unique variation that comes with 
Lindy's Starbursts and Magicals.


Our Limited Edition Kit included a VERY generous supply of Starburst Sprays...
(Industrial Chic) The WHOLE set...love that!  Thank you Tina!

For this project, I used Magicals instead of the sprays, because I had them on hand before 
I received my sprays in the mail.  

The Industrial Chic Magicals produce the same colors as the Starburst Sprays
but they allow you to create a specific "concentration" of color as you go, because you can mix small portions, varying the amount of intensity by the ratio of powder to water.  

The Sprays offer the advantage of having the color already mixed and ready to spray.  
When using the magicals as a spray, you must mix with warm water in a separate spray bottle.

I often "grab" a bit of the Magical powder with a dry brush, placing it in the lid of the container.
Then, I add a little water to my brush and stir, until I get the color I want.

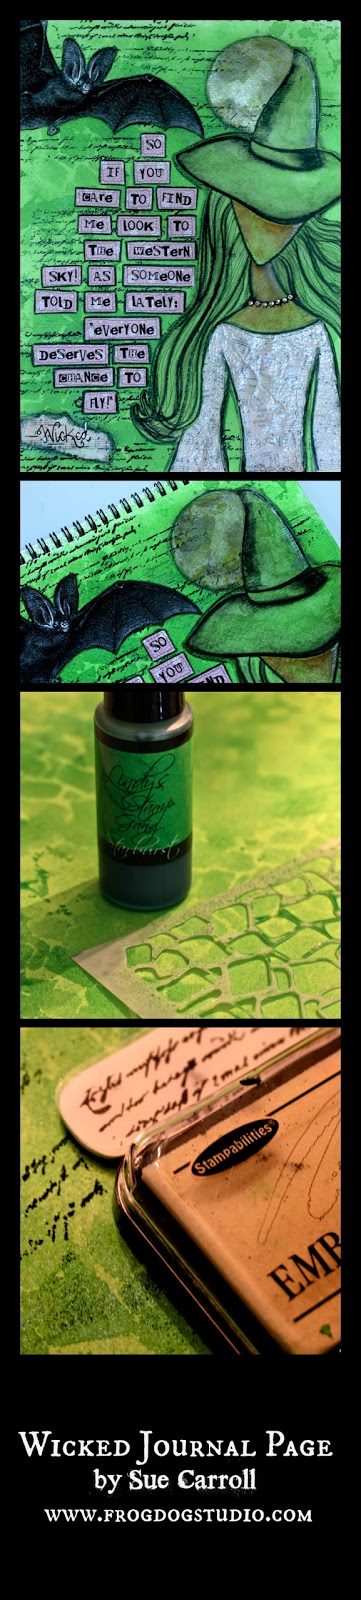
This is the technique I used and these are the colors on my journal page...

Rusty Lantern Lime
Shabby Turbine Teal
Steampunk Sepia
Time Travel Teal
Steel Shimmer(Glitz Spritz)
with the addition of 
Cajun Carnelian Red

I began by drawing loose wavy lines across my water color journal page in pencil.
Then filled in each space with color.


Above you can see the set lined up...notice the color in the lids...I used these as my "palette" loading a dry brush with a bit of powder, then spritzing a little water in each lid.  I mixed until the color became uniform, then spread it on the page, adding water as needed to keep the color flowing.

You can "paint" the sprays on your page in this same way, by shaking your spray bottle to make sure all the lovely bits of color are mixed, then open your bottle and dip your brush in!


The variation of tones and the shimmer from the mica in the powder is difficult to capture in a photo, but I think you can see some of the shimmer above.


I used my 2 favorite pens to add doodles to each color space.  (Scarlet Lime, and Uni-ball Signo)


The next step is to "lay down" an image or words that will be left "uncovered" after adding black (or you could use white) paint, leaving the image or words showing with the doodles coming through.

If you feel confident to draw letters/images free hand -do that, OR trace letters and shapes
 like the ones below.


You can use chipboard like above, or you could find a font you like, write your "sentiment" in a word document (creating the appropriate size for your project) then print out...cut out...and trace!


Above you can see where I first drew the words with a pencil, then went over those lines "sometimes roughly" with my "Scarlet Lime" pen.

Next, I covered the rest of the page with black gesso.  (you can use acrylic paint in any color, but I thought the black would be a great contrast to the Lindy color and compliment the doodling.

Below, is the Rusting Powder from our regular kit.


WE ALL LOVE THIS STUFF!!  

To use it, simply apply any type of glue (including matte medium, embossing liquid, or craft glue) then sprinkle the powder over those areas.  Make sure you tilt your piece and catch the excess to put back into your jar...you won't want to waste a drop, it's so fun to use!!


To activate the Rust Powder, spritz with a white vinegar....then let dry.  You'll see some of the rust effect within 10-15 min...but more will appear with time.  If it is not rusting as much as you want, spray with a bit more vinegar.  Let this dry.

I happened to have a "rust activator" that I use with a "rusting paint" (pictured below)

This also worked to activate the rust powder. 


Just a few close ups of the beautiful color achieved with Lindy's Magicals/Starbursts.

I outlined the letters with a Uni-ball Signo pen.


I think the Rust Powder adds such great texture!


Aren't we ALL just "girls with ideas?"  

Hope you enjoyed my first March project:)

It's a joy to share with you!

Sue


Saturday, October 19, 2013

Wicked Journal Page


I have seen the musical "Wicked" 4 times, and could see it more!  

The story and characters are great, but the music is some of the most memorable in Musical History:)

I was listening to it when this page sprung to life.


I started with a Watercolor Pad, Lindy's Stamp Gang Starburst Spray in Freaky Franken Lime, and our Original Frog Dog Studio Stencil...both in our October Kit.

I wet the paper with water using a sponge brush.

Next, I sprayed the Starburst, and used the brush to spread it across the page.  This gave a lighter background in order to layer more concentrated Spray with the stencil.

I moved the stencil around the page, spraying and then blotting with a paper towel.

When I was finished spraying, I turned the stencil over and randomly "stamped" on the excess ink that had built up on the underneath side of the stencil.


I found this cool bat image at this etsy shop....printed it, cut it out, & applied 
it to the page with matte medium.


I did the Moon with Lindy's Stamp Gang Moon Shadow (Golden Doubloons) and outlined it with a 
black Derwent Inktense Pencil.

The Witch was done on a separate page (also watercolor paper) that I sprayed the same way I did the background page.  I drew her in pencil, then outlined her with the black Derwent Inktense Pencil.

This pencil was used to add shading....simply "push" the bold outline towards the center of the image using a brush with water.  The white details were done with a Sakura Uni-ball Signo pen.

I cut her out, and added her to the background page with matte medium.

All elements were outlined with the Derwent Inktense Pencil.


I covered her "dress" with torn vintage paper adhering it with matte medium.

I "inked" it with an embossing pad, and then covered it with 
Lindy's Stamp Gang's embossing powder in Cosmic Pink.  

-Ink, Sprinkle, Tap off excess, and set with heat tool.


The last details were added by stamping the page with a "Script" rubber stamp, using embossing ink and then covering it with Lindy's Stamp Gang embossing powder in Midnight blue.

You can't see the dimension in these pictures, but the embossing powder gives these words great depth that just didn't come across in the photos.

In the close up above, you can see the yummy shimmer made with the Starburst Spray...mmmm....


Finally, the song lyrics were printed on pretty pink scrapbook paper, cut out, glued on (with matte medium) and outlined with the black Derwent Inktense pencil.

If you like the font, it is "FOR THE ONE HUNDREDTH TIME"

EVERYONE DESERVES THE CHANCE TO FLY:)

As always, it is a joy to share with you!

Sue