
Our Guest Designer, Sanna Lippert is back with a A LOT of projects! She just couldn't stop, but we loved that! We seriously love her creativity and are so happy she created more today!
Let's get right to her projects!

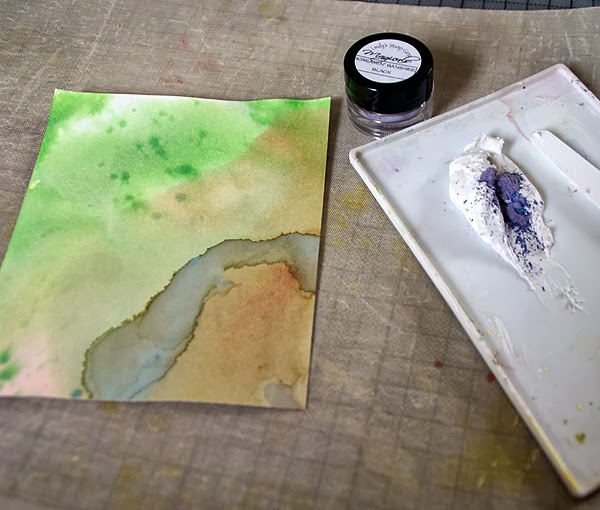
After finishing the second canvas I had still plenty of with water
mixed "Magicals" over so I took a 12x12 inch piece of thick watercolor
paper and very freely applied plenty of color on the paper (as you can
see on the photo, there is a green lake on the paper :)…). The just
waited patiently for the colors to dry (might I add that I am not THAT
patient…). So it was a long wait for me…

For the first
card I cut a piece of that paper out to create a lovely orange
background. I added some green "Maginal" drops with a paint brush over
the orange layer for detail and then I took the white paper bag that all
the lovely Frog Dog Studio goodies were in and stamped some leaves on
it. I wanted to use the bag as the paper is fairly thin which makes it
easy to glue it down on the card with "Glue n´Seal" medium.


Next I just
added a sentiment and the first card was finished. I used StudioAE
stamps by Technique Tuesday for this purpose and stamped with black ink.


For my next card I first took a plain white card base, added some
black color splatters on the background (Magicals), let them dry,
stamped some border images on the white paper bag, glued those down onto
the card using "Glue n´ Seal" medium and tucked the playing card that I
had over from the kit behind the stamped borders.
Then I just added a
sentiment and some spray ink splatters for more interest and the second
card was done. (photos: mixingwithwater, blacksplatters,
stampedonpaperbag & a full and a detail photo of the card)


For
the third card I first punched some circles out of the watercolor paper
everything had started with, inked the circle edges black and added
some Tim Holtz Rubs onto the circles.
Then I took a card base, added
some black splatters (Magicals), glued the circles down, stamped a
sentiment and the card was finished. I just love the two toned powders –
the shine is so beautiful!!! (photos: punched circles,
splattersandinkededges, rubs, beautifulshine, and a detail + full photo
of the card)


For the fourth card I stamped some leave images directly onto the
watercolor paper and glued it down onto a card base.
Next I punched
various sized circles out of the leftover stamp sheet, inked the edges
black and then layered them to create a flower. The leaves are from my
junk drawer and made out of artificial leather. Their color was perfect
for this card. Finally I just added a quote on a personalized tag, glued
a butterfly button in the centre of the flower and added some
dimensional pearls for more interest. (photos: fallenleaf_full,
stampingleaves)


For the fifth card I again used
a piece of that watercolor paper as a background and added some black
(Magicals) splatter over the surface. You might have noticed by now how
much I like to use color splatters ;-). Next I took some struckture
paste, mixed it with the black "Magicals" powder to get a darker tone
and applied it over a The Crafter´s Workshop stencil ("halftone
circles").
Next I took some circles to create more flowers. I layered
different papers over each other to create a different looking flowers
as on the previous card. The leaves are fussy cut and glued down partly
under the flowers. I also stamped a scallop border onto the card with
black ink and fussy cut along it to add more interest to the card.
For
final detail I again added some dimensional pearls into the centre of
the flowers and finally stamped my sentiment. (photos:
liveinthemoment_full, circlespunched, stencilledcircles,
addingmoldingpaste, splatters, coloringstruckturepaste)


For my sixth card I used similar techniques as on the card before
(watercolor background, added some molding paste, punched circles etc.).
It is just a different stencil (four ferns by The Crafter´s Workshop)
and there are some wooden buttons for decoration. Also I stamped another
sentiment and a different border for this one. Other than that, it is
done in the same way.


And
finally card number 7. For this card I tried used the last punched
circles and some of the lovely rub-ons that were on the kit.
I stamped a
border, fussy cut it, glued it down on the upper end of the card, added
some rub-ons for detail and glue down the circles. And naturally, there
had to be some black "Magicals" splatters in there too. Then I just
stemped a sentiment and my last card was done.


And the best thing?
I still have so much product left that I can create many more projects
using the goodies that were in the kit!! I´ve loved using this kit and
hope you will enjoy my little projects and get inspired!! It has been a
pleasure being here!! Thank you Frog Dog Studio and Tina for having me.
It was really great fun!!!
Sanna is a creating machine! She completely blew me away with her October projects. You might want to stop back next month. You may be Sanna again. ;)
Thank you again Sanna for taking the time to share your talent and creativity with us this month! Please be sure and stop by Sanna's Blog and see more of her amazing projects!
Thanks for stopping by! Have a great day!

Thanks for stopping by! Have a great day!

What awesomeness!! I'm gonna have to sit in my craft room and make some art! Don't mind if I copy some of your work? I don't have all the stamps you used, but I do have my watercolors! Thanks for sharing such inspiring cards!!
ReplyDeleteHugs,
Carmen L
Thank you Carmen <3 !! Glad you got inspired by the cards - would be nice to see your creations when they are ready. Maybe you can drop by and leave a new comment so that we can come and take a look?? :) Hugs, Sanna :)
DeleteWOW these are amazing..
ReplyDeleteThanks, Annette :)
Deletexoxo, Sanna
fantastische Designs Sanna! Genial!
ReplyDeleteVielen Dank (Thank you, Susi)!
DeleteThese cards are amazing!!!! So creative, colorful, and fun. Thanks for sharing your techniques and ideas....
ReplyDeletethanks so much, Dawn :) sooo glad you liked them :D
DeleteWow! your designs are wonderful Sanna - just bursting with inspiration! Thanks for sharing all your ideas and techniques - brilliant! :o)
ReplyDelete:) thanks for your kind words, Annie!! glad you liked them :)
Deletexoxo, Sanna
Wow! Sanna's creativity has no bounds - I LOOOVE the way she has used the magicals & those cards have me itching to create....thanks for the inspiration :):):):)
ReplyDeleteThank you, Lizzy!! <3
Deleteyour cards are so beautiful!!
ReplyDeletethank you so much, Katie, so glad you like them :)
DeleteGreat post! I am actually getting ready to across this information which i found very interesting to read.
ReplyDeleteDistributor Baja Ringan | Distributor Genteng
This comment has been removed by a blog administrator.
ReplyDeleteThis comment has been removed by a blog administrator.
ReplyDeleteThis comment has been removed by a blog administrator.
ReplyDelete