
Thank you Gwen for sharing your amazing talent and creativity with us! Before we get to her first project (which you will love), let's get to know her a little better!

Hi everyone, I'm Gwen. I'm a Northern Virginian currently living in
Connecticut. By day I work in online marketing, but by night I'm an
amateur home cook, mixed media artist, paper crafter, and cookie addict.
I'm an aunt to four adorable nieces and nephews, and I absolutely love
to travel... if I'm not on a trip, I'm planning or dreaming about one!
I've been playing with paper and glue since I was about three years old,
and it never gets old. I'm thrilled that I got a chance to play with
this month's kit, and I hope you enjoy my projects as much as I loved
creating them.
Let's get to Gwen's first project!
For my first project, I just used the awesome September kit. Of course, for me, the “kit” also includes the packaging and since I’ve had a thing for working with cardboard lately, I decided to use the box and kit supplies to make an art journal. I’ll admit, I wasn’t sure whether this would work since I was limiting myself to the box and what was inside of it, but I actually really like the result!

Here’s how to make your own cardboard art journal.
Step 1: Make the covers & pages

1. Cut apart the shipping box so that you have two large flat pieces from the top and bottom.
2. Figure out the size pages you want, and trace them out (I did mine 5.25”x7” to match the canvas paper from the kit plus a little extra width for the holes.)
3. Using scissors or a good trimmer (I used a heavy duty rotary trimmer,) cut out the individual pages. I got 6 panels from the box, but ended up only using 5 for the book.
Step 2: Prep the pages.
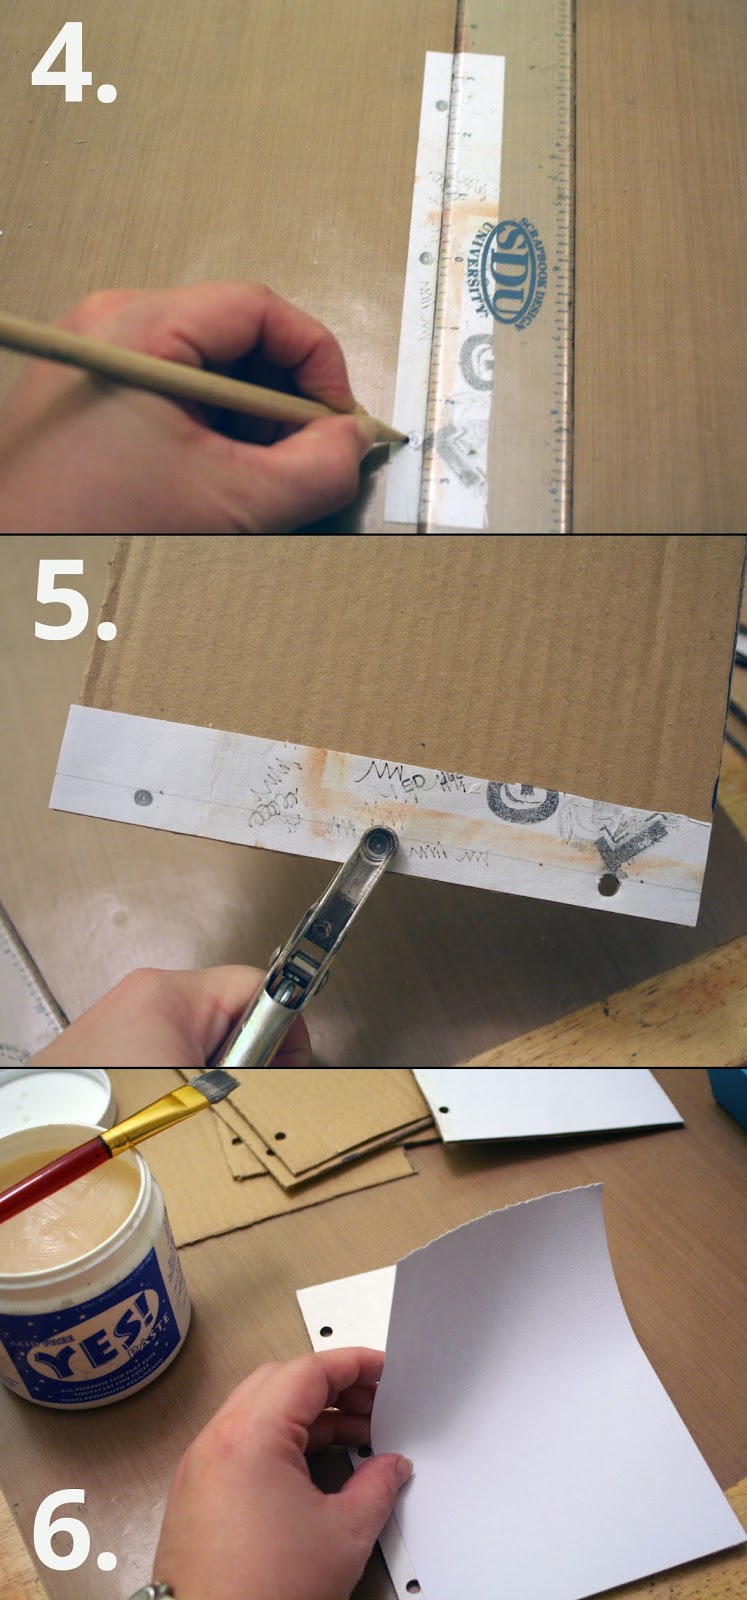
4. Create a punch template to make sure the holes are even. I just grabbed a scrap of paper about 1”x7” and used a centering ruler to mark where I wanted my holes. You could make as many as you want depending on how you want to bind it.
5. Use removable adhesive to attach the template to each page and punch the holes. I thought I was going to need my Crop-a-Dile (which is a good idea if using lots of pressure for punching is hard for you,) but a regular punch worked pretty easily.
6. Use the sheets from the canvas pad to cover the pages. I decided to just put it on one side and leave the brown side – I like working on that kraft color. You could cover every page or leave them all blank. Adhere with your favorite adhesive. I started out with Yes! glue which works great (takes a while, though) and also tried Elmer’s spray adhesive which worked really well too.
Step 3: Decorate your cover

7. I used the full stamp set along with the stamp markers and my neon Hero Arts cube to stamp each of the images onto the cover. I just repeated them in the same order all the way down until it was covered.
8. I cut a title block from a scrap of cardboard, stamped the thought bubble, and used that awesome detail tip to add a title and some details to my stamped images.
9. Finally, I used the Frantage Fragments along with some Glossy Accents (or whatever glue you like) and added some embellishment to the corners of my cover and then gave a good spritz with my white Dylusions mist… it adds so much!
Step 4: Embellish your pages

The first thing I did on my pages was to take my orange Sharpie and draw some designs in the bottom corners of some of my pages. Then I went back through with my Paper Pen and detail tip and added lots of fun details to make the designs pop even more. I love how it turned out! (You can see all of those designs below.)
For the rest, you can certainly use anything in your stash, but I wanted to keep to my challenge to just use the box and what was in it, so I tried to get creative for my embellishing.
10. Bubble wrap is awesome. And it makes a fantastic stamp too! It works best with the ink pad, but it also worked with the stamp pens. I used it with both blue and pink in several places.
11. Cardboard can make another great texture stamp. If you peel off the flat surface on one side to expose the ribbed interior, you have a stamp! This will also work with the stamp pad or the markers.
12. Finally, I went back to the kit stamps and put them all on one acrylic mount and stamped them together in a big block. I really love the look, and it ties in the design on the cover. I also went through and added some of the price stickers and bits of the paint chips.
Step 5: Bind the book
I went through all of the pages and added the neon reinforcements around the holes – it’s a great pop of color! Then I used that cool Rex Lace to bind the book. I just kept it simple, threading a piece through each of the holes and tying a tight double knot in each one.
Here’s how all of my inside pages looked after I finished:


And that’s it! I really like how it looks– it’s ready to fill with words, pictures or maybe some more layers! Probably all of the above. :)
That is such a wonderful and creative project! Thank you Gwen! Be sure and stop back later in the month for another project (or two) from Gwen. We can't wait! Please stop by Gwen's Blog and say hi!
Thanks for stopping by!

Great project!
ReplyDelete