Good morning! Melissa here with a new tutorial using April's kit materials, specifically the super cool mini clipboard. Let's get started!
To begin, I covered the metal clamp from the clipboard with some gesso and the gold ink from the kit (my new favorite ink!). I also dabbed some random spots with Ranger Walnut ink. When that was dry, I used some of my leftover rusting powder from Dusty Attic (from the March kit) to give it an overall distressed look.
While that was curing, I covered the chipboard piece with a piece of the tissue paper from the kit. This blue and gold paper makes me happy!
Next, I added one of the Tim Holtz bingo card stickers and used one of the new Dina Wakely heart stamps and StayZ On ink from the kit to do a little stamping.
I continued to build the collage layers over the bingo card. I used a clip art image of the lady from my stash and fussy cut a little peacock "hat" from another sheet of the tissue paper found in the kit. I found two little flower stickers in my stash and added them onto her hat as well. Found the word "dream" sticking to the side of my collage junk drawer and that seemed to be the finishing touch.Now she's lookin' pretty fancy :)
Using the blue mini StayZ On ink pad, I did some inking around the edges. Just to give it a little definition!
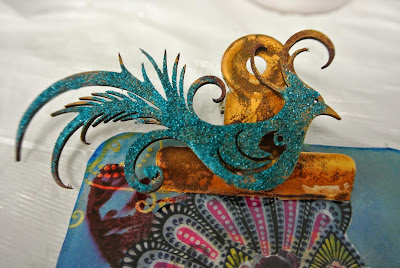
Continuing with the theme of my lady's peacock-ish headdress, I altered a coordinating chipboard peacock to match. This poor little bird went through a few different variations. I finally settled on glitter. I mean, this lady is looking pretty glamorous, so why not!? TEXTURE TIP: In the past I have used glitter paste as a texture, but I think a lot of us overlook just simple glitter. It adds more of a fine grainy texture than what you get with texture paste. At Nat Kalbach's class at CHA we received some gorgeous Stampendous glitter tubes. I used this to make this chipboard dazzling! It started out red, then gold, then I settled on a mixture of the blue glitter with the gold ink. I didn't coat it completely, because I wanted it to look a little vintage to fit with the overall style of the piece.
For the finishing touch, I attached some gold ink enhanced paper flowers from Prima to the clamp. Then I "nested" the peacock above them. I had some leftover Amazing Clear Cast Resin left over from my elephant painting, so I decided to cover the entire chipboard portion with it. I can't bring myself to throw any of that stuff away, it's too awesome!


I really like the gold on your clip!!
ReplyDeleteThank you, Rachel!! That gold ink was definitely one of my favorite bits in the kit!
ReplyDelete