
Today we have a very special guest from the Amazing Crafting Products Creative team, Sandra Strait. She created with our January kit and we would like to share her creation with y'all today.

Hello! Sandra Strait here as a guest poster for Frog Dog Studio. I was so thrilled when I received the January Frog Dog Studio kit. It included a wooden mini-album from Genuinely Jane Studios in the shape of an old-fashioned telephone booth. I'm an avid Doctor Who fan, so I immediately thought of a T.A.R.D.I.S. (Time and Relative Dimension(s) In Space). These are the ships that Time Lords use to travel time and space. I decided I'd make one of my own.
You never see much of the ship's interior, which looks like a telephone booth on the outside, but is humongous on the inside. I took that as my inspiration and decided to try and create some interiors that might belong in such a ship.

The
kit has lots of other exciting pieces -- tissue with the names of cities
printed on it, Liquitex Acrylic Inks, pleated cardstock, clear stamps,
stamp-pad and assorted ephemera. My first challenge was to decide what I
would use and how.

Some
of the ephemera caught my eye because I'd need to make panels and knobs.
But the crystals were too thick. And the cards would make good
panels, but would two be enough? I decided that I wanted the shapes of
these things but in a thinner layer.
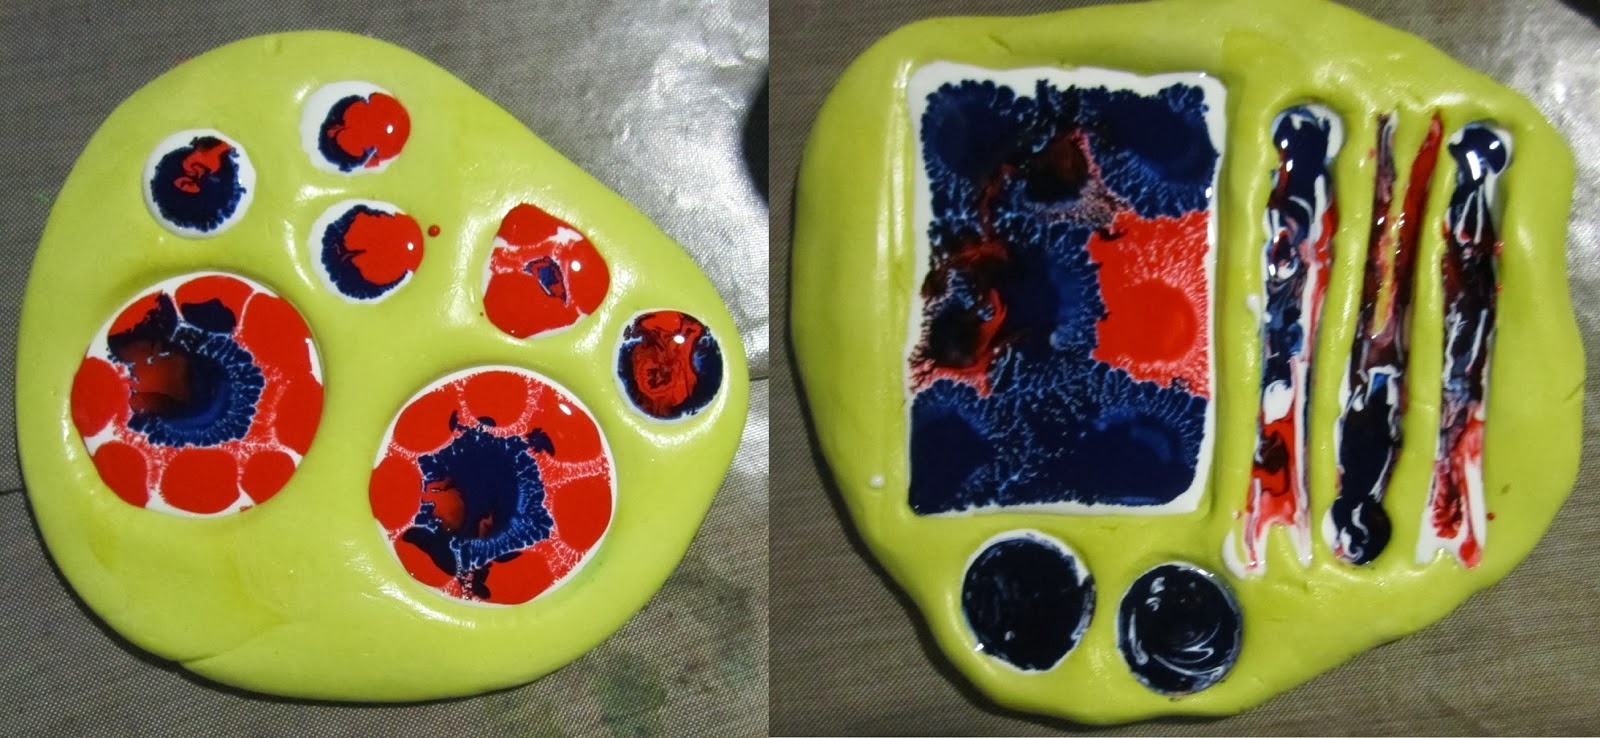
Amazing
Mold Putty to the rescue! It comes in two parts, Part
"A" and Part "B". One of the putties is white and one
is yellow. You mix equal amounts until the piece is entirely yellow and then
you flatten it, and push your item(s) into it.

You
have about five minutes before the putty sets. (There are excellent
instructions at the Amazing Crafting Products
site that can help you learn more).
I mixed
three times, using each ball to mold several items. I even decided to
mold the bottom of the Liquitex Ink bottles. I wanted my molds to be
shallow, so my objects would be 3D but not too deep.
After
letting the Amazing Mold Putty sit
for 5-10 minutes, I pulled the ephemera and bottles free, and set them aside
for use on other projects.

Having
made my molds I had to decide what I would use to cast my pieces. I
wanted them to be clear, but I wanted to use the Acrylic Ink and I wasn't
certain they would work with resin. I decided to experiment and try
casting with PVA glue.
Was
my experiment successful? I think so. I wouldn't recommend PVA glue
for projects where great detail is needed, or if you really want fidelity
between your original item and the casting. What I got is as much
abstract as anything, and that was perfect for a Tardis interior.
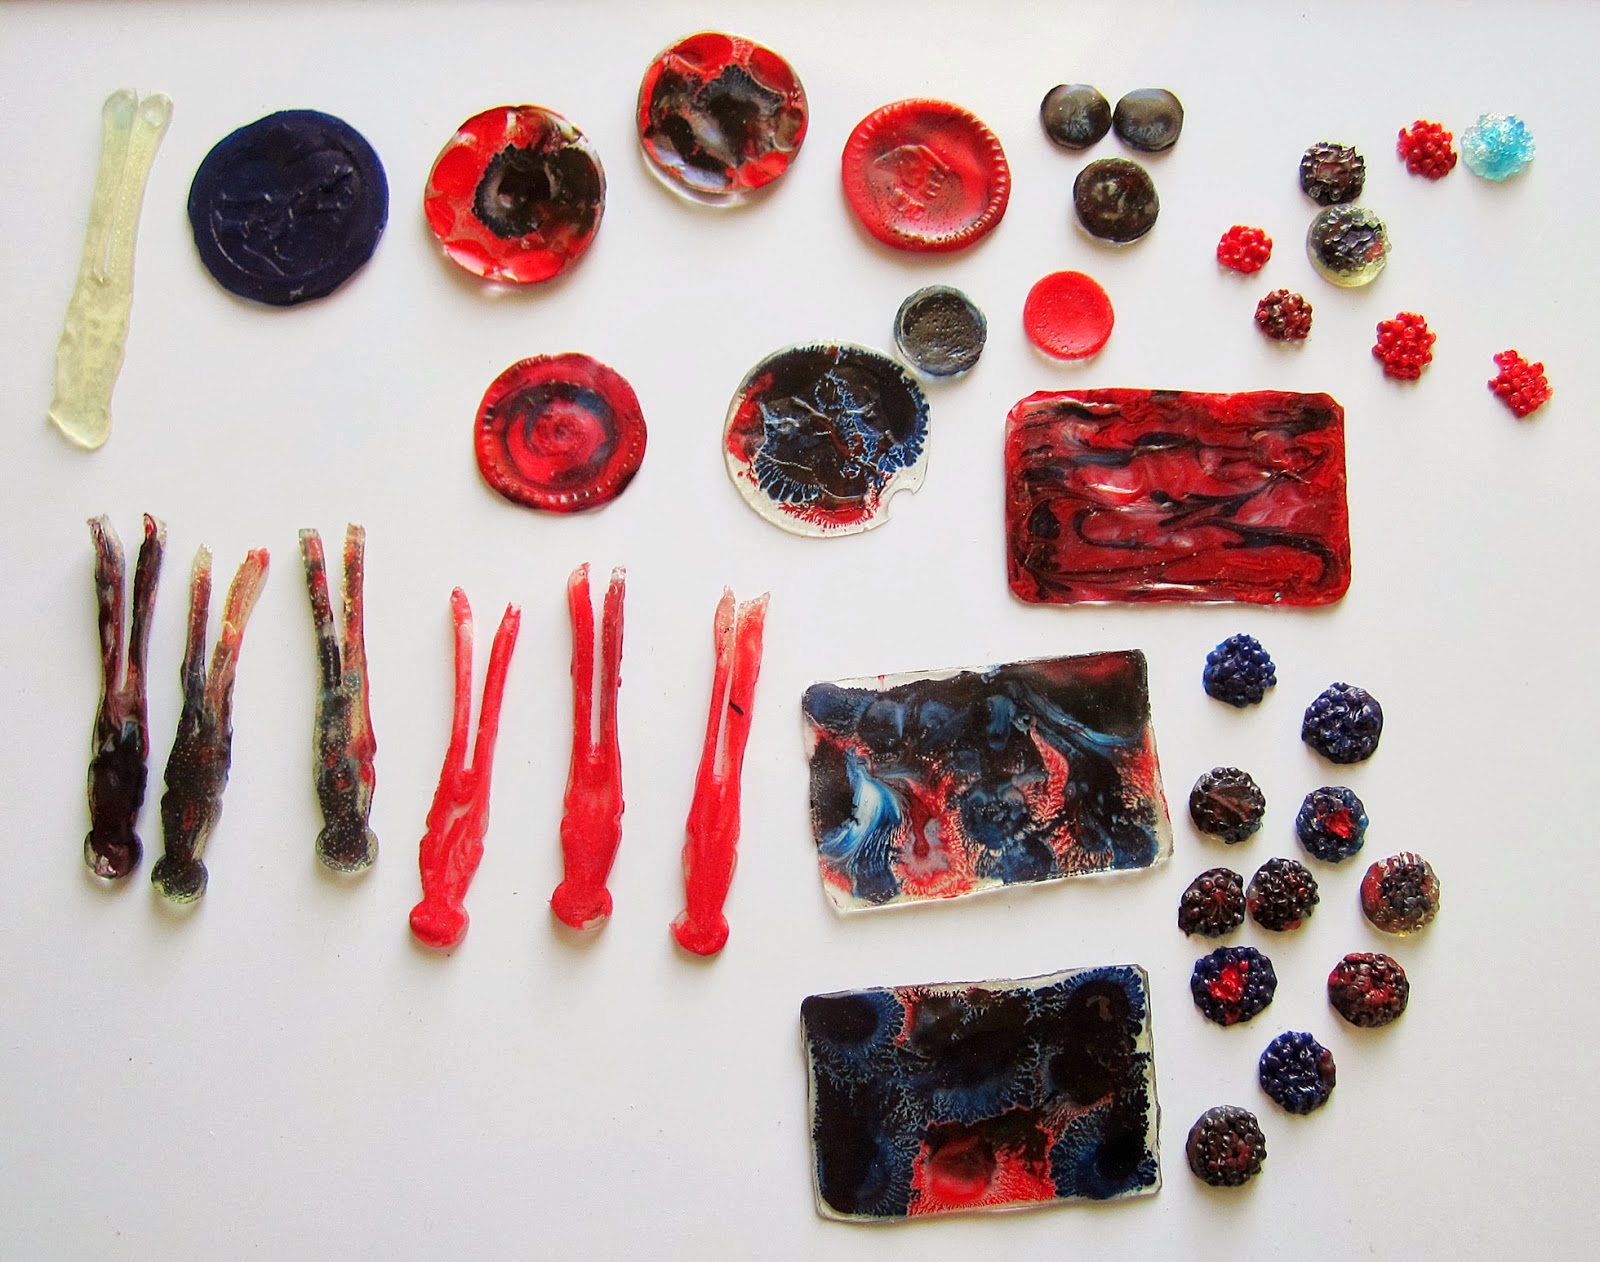
I
decided to go mostly with the more solid colored pieces. The ones, like
these two below with lots of clear areas, are beautiful in the light, but don't
show well against a dark surface. They've given me ideas for playing with
the rest of my Liquitex Ink, though.

Before going any further, I took the album apart for ease in painting and colored all four pieces with the Liquitex Ink. I used the convenient dropper top to lay down streaks of color, and then used a baby-wipe to spread it around.

For
the front of my T.A.R.D.I.S., I painted it a solid blue (Yes. I chose the
same color as The Doctor's ship, but mine has some bells and whistles that his
does not!).
The
blue Liquitex ink varies in color considerably when applied lightly. The
heavier application is a dark navy, almost black, while a very thin application
leans toward an aqua.

I mixed some more of the blue ink with some clear crackle paint and spread it
along the top, sides and bottom, leaving the area around the windows untouched.

I painted the sides of the board and the windows red. I didn't
try to get the inside of the windows solid. I just poked the baby-wipe
through each hole, making the red darker on one side. This gave the
windows a touch of shading and a little bit of a glow.

I had a scrap piece of vellum paper that came from a mono-print I had
done. I cut it to size and glued it behind the windows.

If you hold it where the
light shines through, it gives the effect of stained glass. And see the
faint red glow around the edge of each window?

For my first interior I
decided on a wall to honor the villains and companions of The Doctor. My
background was a mix of the red and blue inks. By the way, the blue
Liquitex ink is more subtle and opaque. The red is brilliant and more
transparent. It shows up well on this board.

I cut off a section of the
pleated cardstock that came with the kit, cut it in half length-wise, and
painted the pleats with the inks. Using a silver metallic pen I wrote the
name of a villain on each pleat.

I played around with the
pleats and various castings until I knew which pieces I wanted to use and where
they should go. I glued them all down using more PVA glue. Using a
gold metallic pen, I wrote down the name of almost all of the Doctor's
companions on the wall itself, and added a little doodling.

For my second interior, I
decided to celebrate my travels. Unlike the Doctor, I've only been to
Europe and Ecuador (but I have a T.A.R.D.I.S. now, so who knows what will
happen next!). The tissue that came with the kit only has the names of
French cities (I think), but I felt that was good enough. I started with
a blue background.

I used a mix of gel medium
and gesso to decoupage strips of the tissue onto the board, and glued
on several castings made from the crystal molds (they look like berries, lol).
I used a metallic violet pen to add some lines.

Then I squeezed some of the
red Liquitex ink onto a q-tip, so I would have better control of the
application, and added a very light layer of red in some areas. In other
areas, I repeated this with the blue.


What would any space ship
be without an alien? I got so involved with creating mine, I forgot to
take pictures, but the process was the same as the other rooms. Paint the
board (a mix of red and blue ink) and then lay down some of the glue castings
I'd made until I had my alien. Then I used metallic pens to create some
detail and add patterns in the background. I finished up using a q-tip to
add a light layer of more blue ink.
 |
I wouldn't want to meet this guy in a dark alley!
I've
enjoyed creating my Tardis from the January Frog
Dog Studio kit, and I hope you've enjoyed seeing how it was
done!
You
can find more of my work at my Life
Imitates Doodles blog. ~ Sandra
Strait.
Thank you Sandra! You totally rocked the January Kit!
Thank you for sharing your creativity with us!

Sandra, Besides great instructions and pictures, you have taken this piece beyond time and space.
ReplyDeleteThis is so stinkin' cool... I have to share this with my girlfriend who is a HUGE Dr. Who fan...
ReplyDeleteFabulous Sandra... The Ood's would sing to the heavens for your alien! Interesting exploration of techniques using Amazing Mold Putty - will have to try these :)
ReplyDeleteThank you all!
ReplyDeleteSandra Strait does amazing work with whatever she starts with. This is no exception!
ReplyDelete