
Hello and Happy Thursday! We have another special guest with us this month, the incredibly brilliant Susan M. Brown from Amazing Crafting Products. She created with the January kit and this is one of her projects.
{Warning: This is a very picture heavy tutorial post. Susan was very detailed in her project steps}
Hello... Can I Get
Your Number??? Amazing Address Book by Susan M. Brown {sbartist}

Amazing Crafting Products Creative Team
Leader and designer Susan M. Brown {sbartist} combines
the Frog
Dog Studio January Kit and Amazing Crafting
Products – our new Partner
"In-Crafting".

Included in the January Frog Dog Studio kit
is a wooden mini-album from Genuinely Jane Studios in the shape of an
old-fashioned telephone booth which Susan has transformed into a fabulous
hanging telephone/address book... complete with a recycled spool of paper for
notes and handmade embellishments, too!

First up I prepped
and painted the wooden phone booth panels that would be front and back covers
to my address book and began to apply Liquitex Acrylic Ink in Pyrrole Red
to the edges of the panels.


I found it worked better to brush a light
coating of water to the wooden panels, then apply ink for a streak-free finish.
The water helped the ink seep into all the crevices and make the brush strokes
disappear.

These beautiful beads that were included with
the ephemera in the kit... did you know they come apart into 5 sections??!!
Yippee - now I won't be possessed to mold them to make 1/2 bead portions for
embellishing.


I mounted and prepared the "Telephone
Book Page" exclusive Frog Dog Studio Stamp onto my strips of recycled
paper using the Clearsnap, Donna Salazar Mix'd Media iNx Stamp Pad in
black. I rotated the stamp in different directions to fill the page. Then I overstamped
using the phones and telephone lines from the "Communication 4x6 Stamp Set
to create a stamped collage that will line the inside cover of my address book.

I trimmed my completed collage to size and
edged with a Warm Red Cat's Eye Chalk ink. Using glue stick {my glue of
preference for book building} - and a generous "slathering" I adhered
my collage to the inside cover.

This panel is complete!
OK - Now my apologies for this being so photo heavy... but I'm all
about the little details!
AND I have a little **TIP** to
share... what if you are in the throws of creating and you don't have an
acrylic block in reach? Look around on your worktable for some packaging that a
cling mounted stamp will fit to. I did have an acrylic block handy... but it
was 5 x 7 size {way to large for stamping small words and such}.


Clearsnap is pretty smart by providing a
super smooth cover that a cling mount stamp sticks to perfectly in a pinch. I
used the cover to stamp my word phrases, pressing lighter than normal and it
worked great!

A note: I always do a
practice stamping on a scrap paper first before stamping onto my work.


I cut a two sections
of the Bazzill Basics Paper Perfectly Pleated Packet to fit the width of
the cover and stamped S.O.S and telephone lines on top. Then I added "ring
a ding a ling" underneath where the first pleated border will go.

Using a black journaling pen, I filled in any gaps in the imagery
resulting in stamping over the pleats. Now you know my secret!

Using red-line double sided tape {great for
holding together items on rough & painted surfaces}, I adhered my two
pleated borders. Now I'm ready to prep for making my phone embellishment.
Now it's time to break out the Amazing Mold Putty!
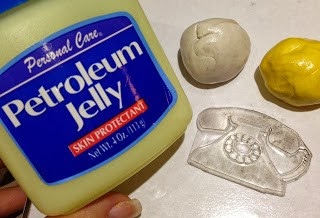

You can make a mold using rubber stamps, but
there needs to be some preparation. There is a chemical reaction when
contact between a rubber stamp and Amazing Mold Putty happens, so you need
to generously apply a protective layer of petroleum jelly to the stamp before
pressing into the mold putty to create a mold. I also warm up each part of the
mold putty by working it in my hands to help accelerate the curing process once
mixed – so that I can remove the stamp as quickly as possible. I prepared equal
amount of parts "A" and parts "B" of Amazing Mold Putty,
then coated the rubber stamp with petroleum jelly.


Now combine the two
parts of Amazing Mold Putty together until there
is no visible swirls and until it is a uniform yellow color. Shape into an oval
and smooth out any finger prints or marks in the surface of the putty as that
will become embedded in your mold image if left that way.


Gently press stamp, face down into the mold
putty and press into the ball while at the same time bringing up the sides to
create a sidewall for resin to be poured. When you have it the way you like it
and the desired depth, set it aside to cure for 10-15 minutes.
While this sets up - I will jump back to my address book!
OK - now I'm ready to start assembling my
address book. I whipped up some address pages on the computer and printed them
onto 2 1/2" x 14" strips of 100% recycled paper – perfect width to
fit inside the covers and I could get two pages out of each strip {I work in
the printing industry and this paper I've saved from a freelance job I did a
while back - 100% recycled paper is really expensive and the leftovers were
perfect size for mini book pages}.

I printed rows of capital letters onto a
piece of the Stick-on Canvas that was in the Frog Dog Studio December Kit. I
have a heavy duty laser printer that I have tested printing on canvas prior -
so please don't try this on your printer unless you know that it can do it.
This will make quick work of having custom tabs on my address pages.

I used a page from an old cheapy address book as a template to
follow for my page formatting.
With my pages and tab letters printed - I'm ready to paint!

Using the Liquitex Acrylic Inks in Prussian Blue
and Pyrrole Red - I placed some ink onto my craft mat along with a
cap of water to dilute the color.

Picking up a little ink and water, I began to paint alternating
red and blue stripes for my letter tabs.

Painted stripes completed. Cut between each color stripe and
separate individual letter tab strips.


Fold strip of painted canvas letters and remove backing.
Bend and place fold over/around edge of page and press adhesive in
place.

I placed alternating color tabs for each letter and staggered
between a few blank pages.

Completed tabs.


I punched pages to add a Zutter binder ring.
It's not a complete project if I'm not repurposing something that
was headed for the bin...
for this part of the project, I'm repurposing a receipt tape spool
that I will wrap blank paper onto and suspend from the bottom of my address
book for a fun message center feature.

Using glue stick. I glued blank strips of
recycled paper into one long strand by overlapping at the end with glue stick.
I tear the edge of the overlapping paper so that the overlap blends away.

Now I have one continuous length of about 10 feet of paper – so
fun!


Affix long strand of paper to recycled receipt spool using color
coordinating washi tape.

I went back and added washi tape over the
seams where I glued pages together, then wound it all up onto the spool. I
finished of the ends of the spool with two halves {one on each end}of the same
beads used on the cover adhered with E-6000. There is a small hole where I can
feed wire through the bead so I can suspend this from the bottom of my address
book base. I've repurposed a pencil from IKEA with the washi tape and wire
hanger also so there won't be any searching for a pen.
Now for the finishing touches and to create my cast resin phone
embellishment!

I've dusted the mold with Alumilite Pearlescent Powder which helps ease in release from
the mold,
plus it gives a beautiful sheen to the Amazing Casting Resin piece.


Combine equal amounts
of Amazing Casting Resin parts "A"
and "B". Pour in a separate container to mix thoroughly and it will
go from cloudy to clear when completely combined. This is my mixing cup which
has many, many layers of cured resin in it. Once the resin is cured - it's
solid and will not affect the next mixed batch.

Amazing Casting Resin turns opaque white
as it cures.


Remove cured cast resin piece and trim excess
while it is still flexible and sand edges with emory board. Due to chemical
reaction of contact between rubber stamp and Amazing Mold Putty, there is some pitting and
some pieces of mold stuck to the cured resin. This along with the petroleum
jelly is easily washed away with soap and water. Dry resin piece completely
before proceeding.


Paint blue ink on and buff away with paper towel to expose relief
detail.

I rubbed, then buffed a little of the black ink onto the piece to
add a little extra depth, then glued the phone embellishment and two halves of
beads onto cover using E-6000.

The completed Address Book and message center has recycled bits
and a little bling, too!
WOW - what an amazing project. Thank you Susan for sharing that with us. If you are looking for more inspiration, please be sure and visit the Amazing Crafting Product blog.
Thanks for stopping by! Have a great day.

This seriously freaking rocks!! I'm in love!!
ReplyDeleteThanks so much Emily! I'm glad you like it :)
DeleteSusan that is one great project
ReplyDeleteThanks Maria - I don't think I'll be gifting this project :)
Deleteawesome project!!! sooo creative!! *love*
ReplyDeleteThanks Sanna!
DeleteThis is amazing! I'll take one please! ( For my Birthday!)
ReplyDelete